

This tutorial was written on Monday, April 23rd 2012 by Mystery Designs. It was written in PSP X2 and assumes a good, working knowledge of the program. Any similarity to other tutorials is purely coincidental and not done intentionally. Please do not copy or claim the tutorial as your own. If you wish to do so, please link to my blog should groups or forums use it in challenges, and please leave me a comment with a link to where it is being used. Thanks :)
**Supplies Needed**
Tube of choice. I'm using the art of Alex Prihodko. You need a license to use their art and you can find them over at Pics For Design here
Scrapkit of choice. I'm using a simply gorgeous kit called “Ballerina Girl” by Stef of Stef's Scrapkits. You can purchase it here
Mask of choice. I'm using a freebie mask by Designs By Vaybs (Mask 107) which you can collect here
Font of choice
When downloading supplies, please don't forget to leave some love for the awesome designers! Thanks!
**Plugins**
None
Ready? Lets begin.....
Open up your tube
Press shift + d to duplicate it
Close the original
Open a new image – Canvas Size – 650 x 650 pixels
This is just to allow room to work, the tag can always be resized later on :)
Open up “ele42_BallerinaGirl_StefsScrapkits” from the kit
Copy – Paste – As New Layer and rename “Frame”
Grab your tube
Copy – Paste – As New Layer and rename “Tube1”
Highlight your “Frame” layer
Grab your Magic Wand tool with these settings :

Select the inside of the frame
Selections – Invert
Highlight your “Tube1” layer and erase any of your tube which overhangs the bottom edge and the right side of the frame
Selections – None
Add a drop shadow
Highlight your “Frame” layer
Grab your Magic Wand and select inside the frame again
Selection – Modify – Expand – 4 pixels
Layers – New Raster Layer and rename “Inside”
Open up “pap13_BallerinaGirl_StefsScrapkits” from the kit
Copy – Paste – Into Selection
Selections – None
Drag this layer down in your layer palette so it is below your “Tube2” layer
Lower the opacity to around 71
Highlight your “Frame” layer
Open up “ele17_BallerinaGirl_StefsScrapkits” from the kit
Copy – Paste – As New Layer and rename “Vine1”
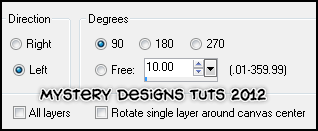
Image – Rotate – Free Rotate with these settings :
Arrange over on the left-hand side of the frame
Layers – Duplicate and rename “Vine2”
Image – Mirror
Layers – Merge – Merge Down
Add a drop shadow
Highlight your “Tube1” layer
Open up “ele11_BallerinaGirl_StefsScrapkits” from the kit
Copy – Paste – As New Layer and rename “Bow1”
Image – Resize – 65%
Arrange along the top edge of the frame
Add a drop shadow
Layers – Arrange – Move Down
Highlight your “Tube1” layer
Open up “ele22_BallerinaGirl_StefsScrapkits” from the kit
Copy – Paste – As New Layer and rename “Pot”
Image – Resize – 45%
Arrange over at the bottom-right of the frame
Add a drop shadow
Open up “ele03_BallerinaGirl_StefsScrapkits” from the kit
Copy – Paste – As New Layer and rename “Bow2”
Image – Resize – 45%
Arrange over on the top edge of the pot we just placed
Add a drop shadow
Open up “ele45_BallerinaGirl_StefsScrapkits” from the kit
Copy – Paste – As New Layer and rename “Cushions”
Image – Resize – 45%
Arrange along the bottom edge of the frame
Add a drop shadow
Open up “ele15_BallerinaGirl_StefsScrapkits” from the kit
Copy – Paste – As New Layer and rename “Beads”
Image – Resize – 80%
Image – Mirror
Arrange along the bottom edge of the frame
Add a drop shadow
Open up “ele49_BallerinaGirl_StefsScrapkits” from the kit
Copy – Paste – As New Layer and rename “Bag”
Image – Resize – 20%
Arrange over to the right of the tag near the pot we placed earlier
Add a drop shadow
Open up “ele38_BallerinaGirl_StefsScrapkits” from the kit
Copy – Paste – As New Layer and rename “Dog”
Image – Resize – 25%
Arrange over by the bag and pot on the bottom-right of your tag
Add a drop shadow
Open up “ele20_BallerinaGirl_StefsScrapkits” from the kit
Copy – Paste – As New Layer and rename “Flower”
Image – Resize – 20%
Duplicate and arrange the flowers at various points on the vine.
Add a drop shadow to all the flowers
Highlight your “Raster1” layer
Grab your Foodfill tool
Change your foreground colour to #e36ba9 and your background colour to #ddb7bb
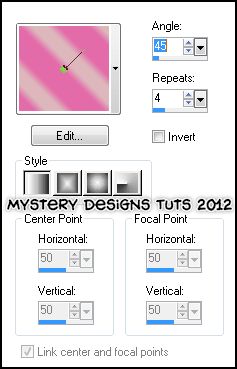
Change your background to gradient – foreground/background with these settings :
Floodfill your “Raster1” layer
Layer – Load/Save Mask – Load Mask From Disk
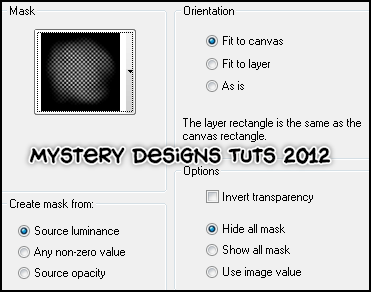
Load “DBV Mask 107” with these settings :
**If you wish to resize your tag, now is the time to do so**
Add your name and all copyrights.
Save your finished tag and you’re done!
Here is another example using the beautiful ballerina tube which comes with Stef's kit


No comments:
Post a Comment