

This tutorial was written on Sunday, April 22nd 2012 by Mystery Designs. It was written in PSP X2 and assumes a good, working knowledge of the program. Any similarity to other tutorials is purely coincidental and not done intentionally. Please do not copy or claim the tutorial as your own. If you wish to do so, please link to my blog should groups or forums use it in challenges, and please leave me a comment with a link to where it is being used. Thanks :)
**Supplies Needed**
Tube of choice. I am using one of Xeracx's beautiful Breast Cancer Awareness girls. You need a license to use his art and all the info is over on his store here
Scrapkit of choice. I am using this beautiful FTU add-on kit called “Think Pink” by Kooky Cat Designs which you can collect from here
Template of choice. I am using a freebie by Punky Butts Tutorials – Template 136 which you can download from her blog here
Mask of choice. The one I am using is by Weescotslass (Mask 84) and can be collected over on her blog here
Font of choice.
Please don't forget to leave some love when downloading, thanks :)
**Plugins**
DSB Flux – Bright Noise
Ready? Lets begin.....
Open up the template in PSP
Press shift + d to duplicate it
Close the original
On the duplicate, delete the Pbs Credits, Font Used:Georgia, small rec right and small rec left layers
Open up your tube of choice
press shift + d to duplicate it
Close the original
Highlight the "left circle" layer
Selections – Select All – Float – Defloat
Open up “KCD_thinkpink_paper3” from the kit
Copy – Paste – Into Selection
**Do Not Deselect**
Grab your tube and Copy – Paste – As New Layer and rename “Tube1”
Arrange it over the selection until you are happy with the placement
Selections – Invert and hit delete
Layers – New Raster Layer and rename “Blank”
Selections – Select All
Highlight your “Tube1” layer again
Image – Crop To Selection
Change the Blend Mode of this layer to “Overlay”
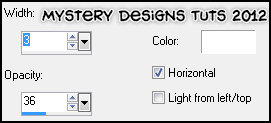
Effects – Texture Effects – Blinds with these settings :
Highlight the “right circle” layer
Selections – Select All – Float – Defloat
Grab “KCD_thinkpink_paper3” again
Copy – Paste – Into Selections
Selections – None
Highlight your “Tube1” layer
Layers – Duplicate and rename “Tube2”
Image – Mirror
Drag this layer up in your layer palette so that it is above the “right circle” layer
Highlight the “left circle frame” layer
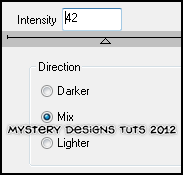
Effects – Plugins – DSB Flux – Bright Noise with these settings :
Adjust – Sharpness – Sharpen
Add a drop shadow
Highlight the “right circle frame” layer
Effects – Plugins – DSB Flux – Bright Noise with the same settings
Adjust – Sharpness – Sharpen
Add a drop shadow
Highlight the “back square” layer
Selections – Select All – Float – Defloat
Open up “KCD_thinkpink_paper5” from the kit
Copy – Paste – Into Selection
Selections – None
Highlight the “back square frame” layer
Add a drop shadow
Highlight the “square rotate left” layer
Selections – Select All – Float – Defloat
Open up “KCD_thinkpink_paper1”
Copy – Paste – Into Selection
Selections – None
Highlight the “left square frame” layer
Add a drop shadow
Highlight the “square rotate right” layer
Selections – Select All – Float – Defloat
Open up “KCD_thinkpink_paper8” from the kit
Copy – Paste – Into Selection
Selections – None
Highlight the “square right frame” layer
Grab your tube
Copy – Paste – As New Layer and rename “Tube3”
Resize and arrange your tube over the middle square
Once happy with the placement
Layers – Duplicate and rename “Tube4”
Drag your “Tube4” layer down in the layer palette so that it is below the “square right frame” layer
Hide your “Tube3” layer for a moment
Highlight the “square rotate right” layer
Selections – Select All – Float – Defloat
Selections – Invert
Highlight your “Tube4” layer
Grab your Eraser Tool and wipe out any of your tube that overhangs the bottom of the square
Selections – None
Add a drop shadow
Highlight the “square right frame” layer
Grab your Magic Wand Tool with these settings :

Select the inside of the frame
Selections – Invert
Unhide and highlight your “Tube3” layer
Grab your Eraser Tool again and once more, remove any overhang at the bottom of the square
Selections – None
Highlight the “square right frame” again
Effects – Plugins – DSB Flux – Bright Noise with the same settings as previously
Adjust – Sharpness – Sharpen
Add a drop shadow
Highlight the “fight like a girl top” layer
Drag the layer down in your layer palette so that it is below the “square rotate right” layer
Add a drop shadow
Highlight the “fight like a girl bottom” layer
Add a drop shadow
Highlight the “heart” layer
Effects – Plugins – DSB Flux – Bright Noise with the same settings
Adjust – Sharpness – Sharpen
Highlight the “square top” layer
Add a drop shadow
Highlight the “square bottom” layer
Add a drop shadow
Highlight the “BCA glitz” layer
Add a drop shadow
Highlight the “BCA” layer
Selections – Select All – Float – Defloat
Layers – New Raster Layer and rename “BCA1”
Grab the “KCD_thinkpink_paper3” from the kit again
Copy – Paste – Into Selection
Selections – None
Delete the “BCA” layer
Highlight the “heart” layer
Open up “KCD_thinkpink_bow” from the kit
Copy – Paste – As New Layer and rename “Bow1”
Image – Resize – 10%
Arrange the bow over to the top-left of the frame surrounding your main tube
Drag this layer down in your layer palette so it is above the “square frame right” layer
Layers – Duplicate and rename “Bow2”
Image – Mirror
Arrange your second bow over to the bottom-right of the “left square frame”
Drag your second bow layer down in your layer palette so it is below the “square rotate right” layer
Add a drop shadow to both of your bows
Highlight the “heart” layer again
Open up “KCD_thinkpink_bcaribbon2” from the kit
Copy – Paste – As New Layer and rename “Ribbon”
Image – Resize – 10%
Arrange the ribbon on the letter “B” of the BCA wordart
Add a drop shadow
Open up “KCD_thinkpink_brad” from the kit
Copy – Paste – As New Layer and rename “Brad”
Image – Resize – 10%
Arrange it over by the ribbon so it looks like it is pinning it in place on the “B”
Add a drop shadow
Open up “KCD_thinkpink_bird” from the kit
Copy – Paste – As New Layer and rename “Bird”
Image – Resize – 10%
Image – Mirror
Arrange the bird so that they are sitting on top of the BCA wordart
Add a drop shadow
Open up “KCD_thinkpink_flower1” from the kit
Copy – Paste – As New Layer and rename “Flower1”
Image – Resize – 10%
Arrange down at the bottom of the letter “B”
Duplicate the flower several times and arrange them along the bottom of the BCA wordart until you are happy with how they look. Add a drop shadow to each of the flowers.
Making sure your top layer in the layer palette is highlighted
Open up “KCD_thinkpink_txtthink” from the kit
Copy – Paste – As New Layer and rename “Think”
Image – Resize – 10%
Arrange it over at the bottom-left of your tag, below the BCA wordart and flowers
Add a drop shadow
Open up “KCD_thinkpink_txtpink” from the kit
Copy – Paste – As New Layer and rename “Pink”
Image – Resize – 10%
Arrange it next to your “Think” at the bottom-left of your tag
Add a drop shadow
Highlight the “Background” layer
Layers – New Raster Layer and rename “Mask”
Using your Floodfill tool, fill your “Mask” layer, colour #f8c3cf
Layers – Load/Save Mask – Load Mask From Disk
Choose “WSL_Mask84” with the following settings :
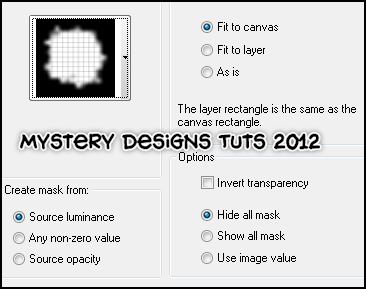
Image – Resize - 115%
**If you wish to resize your tag, now is the time to do so**
Add your name and all copyrights. Save your finished tag and you’re done!
Here is another version using a different image


Here is another version using a different image
No comments:
Post a Comment