
Another quickie Halloween(ish) tut for peeps and my second CT tut....YAY!!! :)

(Please click on the tag above for the full size image. Thanks!)
This tutorial was written on Monday, October 24th 2011 by Mystery Designs. It was written in PSP X2 and assumes a good, working knowledge of the program. Any similarity to other tutorials is purely coincidental and not done intentionally. Please do not copy or claim the tutorial as your own. If you wish to do so, please link to my blog should groups or forums use it in challenges, and please leave me a comment with a link to where it is being used. I'd love to see any results of the tutorial, so please feel free to mail me here with your tags and I would be delighted to display them here on my blog for others to see :)
**Supplies Needed**
Tube of choice. I am using the stunning art of ©Ismael Rac. He is a PTU artist, and you can find his work over here. He also has some free tubes over at his store, all the details are over there.
Scrapkit of choice. I am using the fab freebie by Witchys Heart called “Funky Halloween” which you can find on her blog over here
The cool taggers template by Fi “Halloween 001 Template” which you can find over on her blog here
A mask of choice - I am using “Halloween Cider Spider” by Tonya , which you can find over on the Creative Misfits blog here
Font of choice
WHEN DOWNLOADING SUPPLIES, PLEASE TAKE A MOMENT TO THANK THESE WONDERFUL DESIGNERS WHO SHARE THEIR AMAZING WORK AND TIME SO FREELY. THANKS!
**Plugins**
None
Ready? Lets begin.....
Open up the template in PSP
Press shift + d to duplicate it
Close the original
On the duplicate, delete the copyright layers
Image – canvas size – change to 700 x 700 pixels (you can always resize this later should you wish)
Open up your tube of choice
press shift + d to duplicate it
Close the original
Highlight the "Happy Ghost" layer
Open up Paper 8 from the scrapkit
Selections - select all - copy
Back to the Happy Ghost layer - paste – as new layer
Rename this layer “Ghost Background”
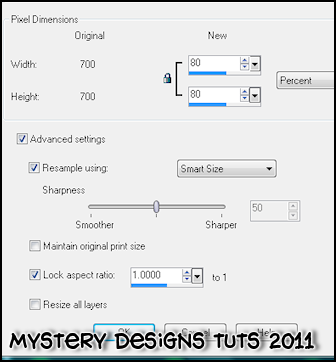
Image – resize – resize 80%, smart size (see below)
Using your freehand selection tool (the one that looks like a lasso) set on point to point and add (shift ) and anti-alias checked (see below), draw around the circle surrounding the ghost

Selections – invert
Making sure the Ghost Background layer is still highlighted - hit delete
Selections – select none
Highlight the "raster 6" layer
Selections - select all - float - defloat
Open up Paper 1 from the scrapkit
Selections - select all - copy
Back to raster 6 layer - paste into selection
**Do Not Deselect**
Copy your tube and paste as a new layer
Rename this layer “Tube Back”
Position your tube to your liking so it shows inside the rectangle
When you are happy with its position go to selections – invert – hit delete
Selections – select none
Still on the Tube Back layer, change the blend mode to Hard Light or whichever blend works best with your choice of tube.
Highlight the “Large Rectangle Outer” layer
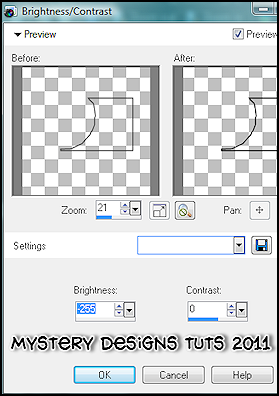
Adjust – brightness and contrast – change the brightness down to -255 and the contrast 0 (see below) It should turn the rectangle outline black.
Add a drop shadow
Highlight the “Circle Inner” layer
Selections – select all – float – defloat
Open up paper 6 from the scrapkit
Selections – select all – copy
Back to the Circle Inner layer – paste into selection
*Do not deselect*
Copy and paste your tube again as a new layer and position it over the selected area. Once you are happy with the placement go to selections – invert – hit delete
Selections – select none
Change the blend mode of the Circle Inner layer to Hard Light or whichever blend works best with your tube, and lower the opacity to around 63%
Highlight the “Circle Outer” layer and repeat the brightness change and drop shadow from before.
Highlight the “Small Rectangle Inner”
Choose paper 8 again, selections – select all
Copy – paste into selection
Selections – select none
Highlight the “Small Rectangle Outer” layer and once again repeat the brightness change and the drop shadow from before
Highlight the “911” layer and again repeat the brightness and drop shadow
Highlight the “Number Boxes Inner” layer
Selections – select all – float – defloat
Layers – new raster layer and rename this new layer “Inner Fill”
Choose a colour from your tube and using your floodfill tool, fill the selection
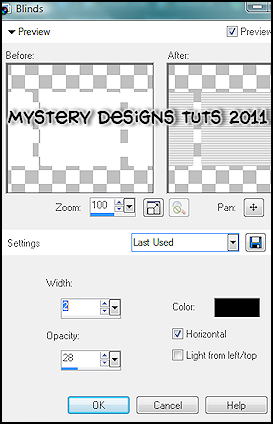
Still on the inner fill layer go to Effects – texture effects – blinds with the following settings :
Selections – select none
Highlight the “Number Boxes Inner” layer again and delete it
Highlight the "Cell Phone Inner" layer
Selections - select all - float - defloat
Choose two colours from your tube/scrapkit – one for the foreground, one for the background.
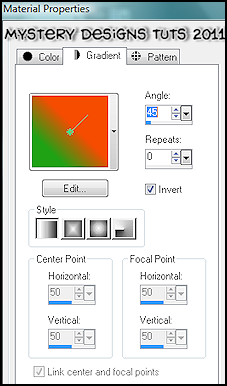
Change your gradient settings to foreground-background with the following settings :
Using your foodfill tool, fill your selection
Selections – select none
Highlight the “Cell Phone Outer” layer and again repeat the brightness changes above but this time there is no need to add a drop shadow.
Highlight the "Main Text" layer
Selections - select all - float - defloat
Layers - new raster layer
Rename this layer “Text Fill”
Using your floodfill tool again with the same settings, fill this selection
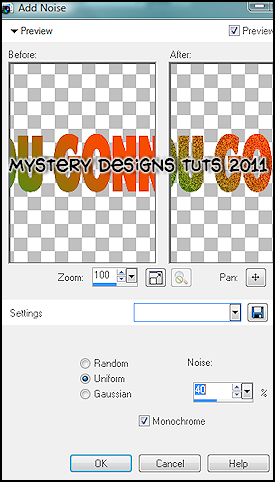
Adjust – add/remove noise – add noise with the following settings :
Selections – none
Highlight the main text layer again and delete it
Highlight the “Angry Ghost” layer and add a drop shadow
Highlight the “Cell Phone Outer” layer
copy and paste your tube and add a drop shadow of choice.
Add any elements from the kit you would like to use at this point
Highlight the bottom layer
Layers - new raster layer
Rename this layer “mask”
Floodfill with a colour of choice
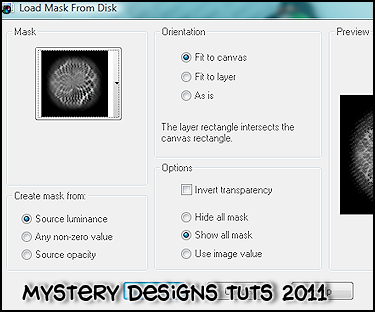
Still with this layer highlighted, go to layers - load/save mask - load mask from disk
Select Halloween Spider Cider mask by Tonya and apply with the following settings :
**If you are wishing to resize your tag, this is the point in which to do so**
Add your name and all copyrights.
Save your finished tag and you’re done!
**********************************
I would like to say a huge thankyou to Fairgem for allowing me to share this here with peeps. This is her beautiful result from the tut above x


**********************************
I would like to say a huge thankyou to Fairgem for allowing me to share this here with peeps. This is her beautiful result from the tut above x
6 comments:
Thank you for sharing your Fab Tutorials :)
Bless you and thankyou for your kind words, I'm happy you are liking my tuts :) x
Come visit your friends at BritsyNin. lol.
Just me tumbleweed.
Hi Tumbleweed. Sorry I haven't been over in a while. I shall call over and do some serious catching up this evening :) Hope all is good with you x
Love the tut and thanks for using my tempy :)
Fi
Hi Fi, thanks for your kindness, and thankYOU again for such an awesome temp to work with!! xx
Post a Comment