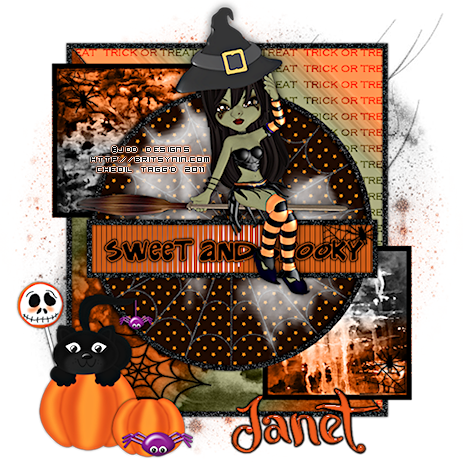
(Please click on the above tag to bring up the full-size image. Thanks!)
This tutorial was written on Thursday, October 27th 2011 by Mystery Designs. It was written in PSP X2 and assumes a good, working knowledge of the program. Any similarity to other tutorials is purely coincidental and not done intentionally. Please do not copy or claim the tutorial as your own. If you wish to do so, please link to my blog should groups or forums use it in challenges, and please leave me a comment with a link to where it is being used. I'd love to see any results of the tutorial, so please feel free to mail me here with your tags and I would be delighted to display them here on my blog for others to see :)
**Supplies Needed**
Tube of choice. I am using the cute art of ©JDD Designs. It is Witchy 4. Her art is FTU, and you can find her work over here Thanks Janet!!
Scrapkit of choice. I am using the adorable freebie by Sleek N Sassy Designz called “Halloween Havoc” which you can find on her blog over here Thanks Jen!!
A fun taggers template by Samantha, which was part of a Misfits collaberation. It is “halloweentemplate3” and you can find it on the Creative Misfits blog over here
A mask of choice - I am using “LD_Sparkle_1” by Linda , which you can find over here
Paper textures of choice. I am using "Glow Textures" by Yoruko which you can find over here
Paper textures of choice. I am using "Glow Textures" by Yoruko which you can find over here
Font of choice
Xero – Iridium
Tramages – Tow The Line
Eye Candy – Gradient Glow
WHEN DOWNLOADING SUPPLIES, PLEASE TAKE A MOMENT TO THANK THESE WONDERFUL DESIGNERS WHO SHARE THEIR AMAZING WORK AND TIME SO FREELY. THANKS!
Ready? Lets begin.....
Open up the template in PSP
Press shift + d to duplicate it
Close the original
On the duplicate, delete the copyright layers as well as the following :
“top line”
“bottom line”
“candy”
“candy back”
“small candy”
“small candy back”
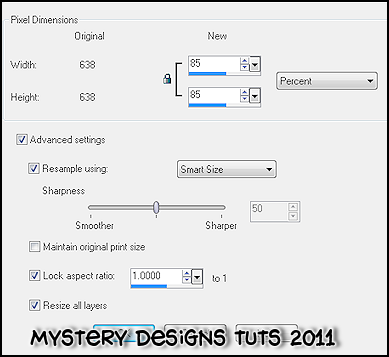
Image – rezize – 85% with these settings :
Open up your tube of choice
press shift + d to duplicate it
Close the original
Highlight the "Circle Back" layer
Selections – select all – float - defloat
Open up Paper 2 from the scrapkit
Selections - select all - copy
Back to the Circle Back layer - paste – into selection
**Do Not Deselect**
Open up the “Spider_On_Web” element
Press shift +d to duplicate it and close the original
Making sure the circle back layer is still highlighted
Copy – paste – as new layer – rename it “web”
Selections – Invert – hit delete
Selections – none
Highlight the “Circle” layer
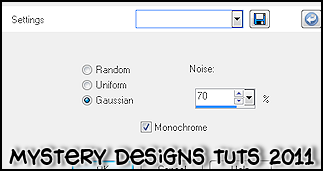
Adjust – add/remove noise – add noise with the following settings :
Gaussian, 70%, monochrome checked
Add a drop shadow
Highlight the left "square back" layer
Selections - select all - float - defloat
Set your foreground and background to colours that compliment your tubes.
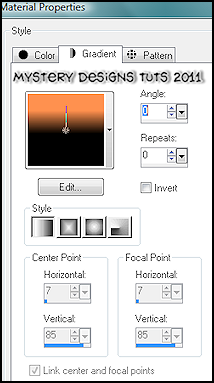
I am using black and #ff914f
Change your background to gradient with the following settings :
Using your floodfill tool, fill your selection
**Do Not Deselect**
Layers – new raster layer – rename this “Left Square Texture”
Open up the “dangerssubstances” paper texture
Selections – select all – copy
Back to your left square layer – paste – into selection
Selections – select none
Change the blend mode of this layer to Luminance Legacy
Highlight the right "square back" layer
Selections - select all - float - defloat
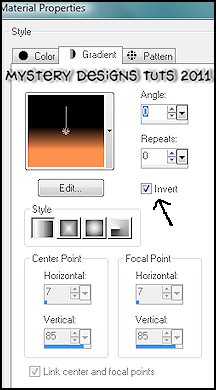
Using the same gradient colours as before, check invert :
Using your floodfill tool again, fill your selection
**Do Not Deselect**
Layers – new raster layer – rename this “Right Square Texture”
Open up the “iloveyou” paper texture
Selections – select all – copy
Back to your right square texture layer – paste – into selection
Selections – select none
Change the blend mode of this layer to Luminance Legacy
Highlight the right “background” layer
Selections – select all – float – defloat
Set your foreground and background to two complimentary colours from your tube
I am using #ff914f and #a1a178
Changing your background to gradient again and use the following settings :
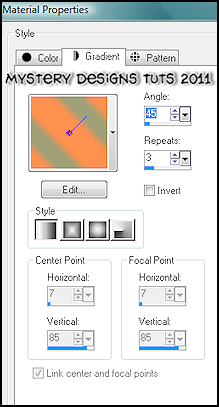
Using your floodfill tool again, fill your selection
Selections – select none
Go to layers – duplicate – rename this layer “Right Background Overlay”
Still with this new layer highlighted
Effects – Plugins – Xero – Iridium with the following settings :
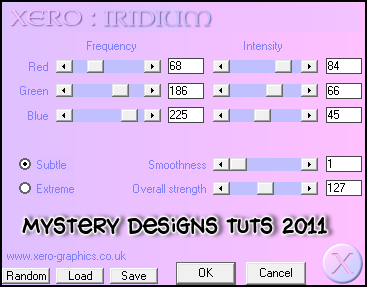
Effects – Edge Effects – Enhance
Change the blend mode to Luminance Legacy
Highlight the “trick or treat words” layer and change the blend mode to Overlay
Highlight the left "background" layer
Selections - select all - float - defloat
Using the same gradient colours as before, change the settings as follows :
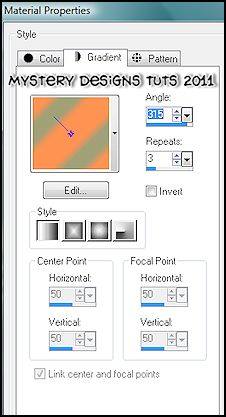
Using your floodfill tool again, fill your selection
**Do Not Deselect**
Layers – new raster layer – rename this “Left Background Texture”
Open up the “corruption” paper texture
Selections – select all – copy
Back to your right background texture layer – paste – into selection
Selections – select none
Change the blend mode of this layer to Luminance Legacy
Highlight the “rec back” layer
Selections – select all – float – defloat
Change your foreground to another complimentary colour from your tag/tube
I am using #c65a19
Using your floodfill tool, fill your selection
**Do Not Deselect**
Effects – Plugins – Tramages – Tow The Line with the following settings :
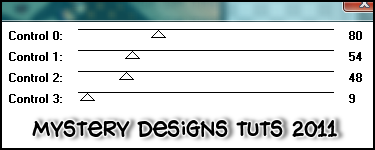
Selections – select none
Highlight the “background square” layer
Adjust – add/remove noise – add noise
Apply the same settings as before (Gaussian, 70%, monochrome checked)
Add a drop shadow
Highlight the “rectangle border” layer and repeat the add noise and drop shadow
Highlight the “left square” layer and add a drop shadow.
Repeat for the “right square” layer.
Highlight the “sweet and spooky” layer
Effects – Plugins – Eyecandy – Gradient Glow and apply the following settings :
Glow Width = 3
Soft Corners = 25
Overall Opacity = 100%
Draw Outside Selection checked
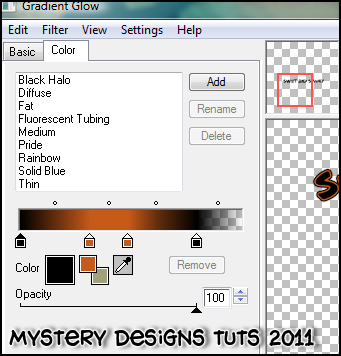
(Again, choose a colour from your tube/tag. I am using black and #c65a19)
Add a drop shadow
Highlight the top “spider” layer
Bring up your tube
Copy – paste – as new layer and rename it “tube”
Resize and position in the centre above the spooky and sweet words
Add a drop shadow
Open up the “Cat_On_Pumpkin” element from the scrapkit
Press shift +d to duplicate it and close the original
On the duplicate go to Image – resize – 35%
With your tube layer still highlighted
Copy – paste – as new layer and rename it “kitty”
Position it to the bottom left of your tag and add a drop shadow
Open up the “Lollipop” element
Press shift +d to duplicate it and close the original
On the duplicate go to Image – rezise – 33%
Copy – paste – as new layer and rename it “lollipop”
Image – free rotate with the following settings :
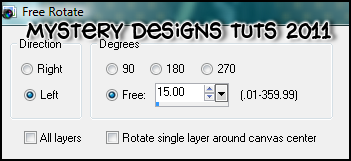
Move it so that it is below the kitty layer and add a drop shadow
Open up the “Spider_Pumpkin” element
Press shift +d to duplicate it and close the original
On the duplicate go to Image – rezize – 21%
Copy – paste – as new layer and rename it “pumpkin”
Move it so that is is above the kitty layer and add a drop shadow
Layers – new raster layer – rename this “Background”
Floodfill this layer with white
Layers – arrange – send to bottom
Layers – new raster layer – rename this “Mask”
Using your floodfill tool, floodfill with a colour or gradient of choice
Still with this layer highlighted, go to layers - load/save mask - load mask from disk
Select LD_Sparkle_1 and apply with the following settings :
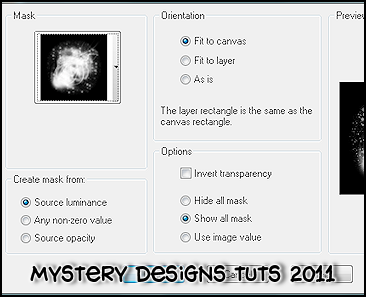
Image – resize – 110%
**Make sure resize all layers is un-checked**
Adjust – add/remove noise – add noise with the previous settings
**If you would prefer a smaller tag, now is the time to resize**
Add your name and all copyrights.
Save your finished tag and you’re done!


No comments:
Post a Comment