


This tutorial was written on Thursday, April 19th 2012 by Mystery Designs. It was written in PSP X2 and assumes a good, working knowledge of the program. Any similarity to other tutorials is purely coincidental and not done intentionally. Please do not copy or claim the tutorial as your own. If you wish to do so, please link to my blog should groups or forums use it in challenges, and please leave me a comment with a link to where it is being used. Thanks :)
**Supplies Needed**
Tube(s) of choice. I have chosen one of Suzanne's Gorjuss girls. You need a licence to use her art, which you can find out more about here
Scrapkit of choice. Pretty much any goth-style kit would work, but I am using a cool, dark kit by Tonya of Broken Sky Dezine which can be purchased here
Fonts of choice.
I am using “Visitor TT2” for the pixel text and “Got Heroin” for the main text
**Plugins**
Penta.com - Dot & Cross
Mura's Meister Copies
Xenofex – Constellation
Xero - Radiance
Ready? Lets begin.....
Open up your tube(s) of choice
Press shift + d to duplicate
Close the original
Main Tag
Open up a new image 600 x 250 pixels
Selections – Select All
Open up “BSD_6” from the kit
Copy – Paste – Into Selection
Selections – None
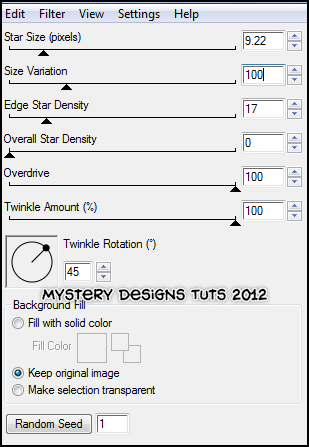
Effects – Plugins – Alien Skin Xenofex – Constellation with these settings :
Grab your tube
Copy – Paste – As New Layer and rename “Overlay”
Effects – Plugins – Mura's Meister Copies – Wallpaper (Rotate) with the default settings
Adjust – Blur – Gaussian Blur – Radius 5
Change the Blend Mode of this layer to "Overlay"
Open up “BSD_flowers” from the kit
Copy – Paste – As New Layer and rename “Roses”
Arrange the roses over in the bottom-right of your tag
Layers – Duplicate
Image – Mirror
Layers – Merge – Merge Down
Effects – Plugins – Xero – Radiance with the default settings
Change the Blend Mode of this layer to “Luminance (Legacy)”
Lower the opacity to around 89
Open up “BSD_Gothicbubbles” from the kit
Copy – Paste – As New Layer and rename “Bubbles”
Arrange the bubbles on your tag until you are happy with their placement
Grab your Preset Shape Tool and choose the Rectangle
Close off your Foreground colour and change your Background colour to black
Draw a medium-sized rectangle over on the left-hand side of your tag (see mine above for guidance)
Convert to Raster Layer and rename “Rectangle 1”
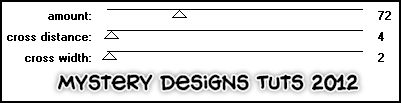
Effects – Plugins – Penta.com – Dot & Cross with these settings :
Layers – Duplicate and rename “Rectangle 2”
Image – Mirror
Drag this layer down in your layer pallette so that it is below your “Roses” layer
Add a drop shadow to both rectangle layers
Highlight your “Rectangle 1” layer
Open up “BSD_gothicheartchain1” from the kit
Copy – Paste – As New Layer and rename “Heart Chain”
Image – Resize – 25%
Arrange it over to the right so it sits over the rectangle we just created
Drag this layer down in your layer pallette so that it is also resting below your “Roses” layer
Add a drop shadow
Highlight your “Rectangle 1” layer
Grab your Preset Shape Tool again still with the Rectangle chosen
Still keep the foreground closed off, but change the background to #9b0207
Draw out a thin rectangle, just a little way above the bottom edge of your tag (see mine above again for guidance)
Convert to Raster Layer and rename “Rectangle 3”
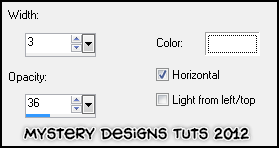
Effects – Texture Effects – Blinds with these settings :
Grab your text tool and type out your saying using a pixel font of choice - colour black. The one I am using is “Visitor TT2 BRK” set at size 18 with anti-alias turned off
**Do Not Convert The Layer Just Yet**
Arrange the text so it is in the middle of your bottom rectangle
Convert to Raster Layer
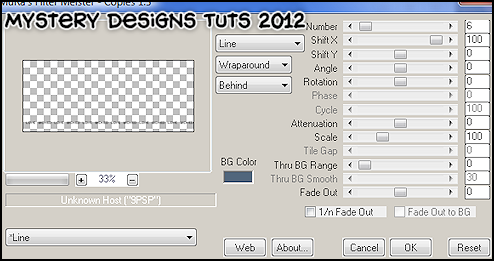
Effects – Mura's Meister – Copies with these settings :
Add a drop shadow
Layers – Merge – Merge Down
Layers – Arrange – Move Down
Grab your eraser tool and erase the overhang in the bottom-left corner
Add a drop shadow
Open up “BSD_frame1” from the kit
Copy – Paste – As New Layer and rename “Frame”
Image – Resize - 30%
Arrange your frame over in the top-right of your tag
Change the Blend Mode of this layer to “Hard Light”
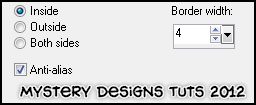
Grab your Magic Wand tool with the following settings :

Select inside the heart frame
Selections – Modify – Expand – 4 pixels
Layers – New Raster Layer and rename “Frame Back”
Open up “BSD_5” from the kit
Copy – Paste – Into Selection
** Do Not Deselect**
Layers – Arrange – Move Down
Grab your tube again
Copy – Paste – As New Layer and rename “Tube 1”
Arrange it inside the heart frame
Once happy go to Selections – Invert and hit delete
Selections – None
Effects – Xero – Radiance with the same settings as before
Add a drop shadow to your “Tube 1” and “Frame” layers
Highlight your “Rectangle 1” layer again
Copy – Paste your tube as New Layer and rename “Tube 2”
Arrange it in the middle of your tag
Layers – Duplicate and rename “Tube 3”
Adjust – Hue and Saturation – both Hue and Saturation set on 0
Change the Blend Mode to “Hard Light”
Layers – Merge – Merge Down
Add a drop shadow
Layers – New Raster Layer and rename “Border”
Selections – Select All
Selections – Modify – Select Selection Borders with these settings :
Grab your Floodfill tool, colour #9b0207 and fill your selection
Selections – None
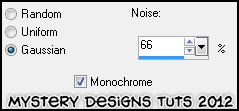
Adjust – Add/Remove Noise – Add Noise with these settings :
Avatar
Before you add your name and copyrights to your main tag
Close off the following layers :
Border, Tube 3, Rectangle 1, Frame, Tube 1, Frame Back, Rectangle 3
Copy Merged
Open up a new image 150 x 150 pixels
Paste – As New Layer and arrange to your liking
Layers – New Raster Layer and rename “Border”
Selections – Select All
Selections – Modify – Select Selection Borders with the same settings as before
Floodfill your border with the same colour as before (#9b0207)
Selections – None
Repeat the Add Noise and add a drop shadow
Add your name or initial to your Avatar as well as all copyrights
Save your Avatar
Un-hide all the previously closed off layers on your main tag
Add your name and all copyrights
Save your finished tag and you're done!

No comments:
Post a Comment