

(Please click the tag to see the full-size image. Thanks!)
This tutorial was written on Wednesday, April 4th 2012 by Mystery Designs. It was written in PSP X2 and assumes a good, working knowledge of the program. Any similarity to other tutorials is purely coincidental and not done intentionally. Please do not copy or claim the tutorial as your own. If you wish to do so, please link to my blog should groups or forums use it in challenges, and please leave me a comment with a link to where it is being used. Thanks :)
**Supplies Needed**
Tube of choice. I'm using one of Barbara Jensen's beautiful bunny girls which you can purchase from her site here
Scrapkit of choice. I'm using a gorgeous freebie called “Shabby Chic Easter” by Kitty which you can collect from her blog here
Mask of choice. I'm using a lovely mask by Vaybs (Mask 58) which you can collect here
Word Art of choice. I've chosen some spring wordart by the Creative Misfits which you can collect on the blog here
Font of choice
When downloading supplies, please don't forget to leave some love for the awesome designers! Thanks!
**Plugins**
None
Ready? Lets begin.....
Open a new image – Canvas Size – 650 x 600 pixels
If you like smaller tags, we can always resize later on :)
Open up your tube of choice
press shift + d to duplicate
Close the original
Open up element “KSP_SCEM_EE(12)” from the kit
Copy – paste – as new layer and rename “Frame”
Image – resize – 20%
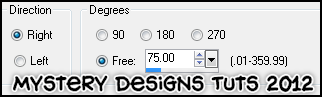
Image – Rotate – Free Rotate with the following settings :
Grab your Magic Wand Tool with the following settings :

Select the inside of the frame
Selections – Modify – Expand – 5 pixels
Layers – New Raster Layer and rename “Fill”
Open up “KSP_SCEM_PP(2)” from the kit
Copy – Paste – Into Selection
Layers – Arrange – Move Down
**Do Not Deselect**
Open up “KSP_SCEM_EE(2)” from the kit
Copy – Paste – as new layer and rename “Overlay”
Arrange your image over the selected area until you are happy
Selections – Invert and hit delete
Highlight your “Raster 1” layer
Selections – Select All
Highlight your “Overlay” layer
Image – Crop To Selection
(This should remove any excess which could prove tricky if resizing)
Change the Blend Mode of this layer to “Luminance (Legacy)”
Lower the opacity to around 63
Highlight your “Frame” layer
Using your Magic Wand Tool, select inside the frame again
Selections – Modify – Expand – 5 pixels
Highlight your “Overlay” layer
Grab your tube
Copy – Paste – as new layer and rename “Tube1”
Selections – Invert and hit delete
Selections – None
Change the Blend Mode of this layer to “Luminance (Legacy)”
Lower the opacity to around 53 (or whatever suits the tube you have chosen)
Layers – Duplicate and rename “Tube1a”
Change the Blend Mode to “Screen”
Lower the opacity to around 59 (or whatever suits your particular tube)
Highlight your “Frame” layer
Add a drop shadow
Open up “KSP_SCEM_EE(14)” from the kit
Copy – Paste – as new layer and rename “Twig1”
Image – Resize – 20%
Position over to the left-hand side of the frame
Layers – Duplicate and rename “Twig2”
Image – Mirror
Position over to the bottom right-hand side of the frame
Don't worry about it being too long, we will erase any excess in a little while once we've added the other elements.
Add a drop shadow to the “Twig1” and “Twig2” layers
With your “Twig2” layer highlighted
Open up “KSP_SCEM_EE(9)” from the kit
Copy – Paste – as new layer and rename “Flower1”
Image – Resize – 25%
Position it over on the bottom right-hand corner of your frame
Add a drop shadow
Open up “KSP_SCEM_EE(6)” from the kit
Copy – Paste – as new layer and rename “Flower2”
Image – Resize – 20%
Position it along the bottom of your frame next to the previous flower
Add a drop shadow
Open up “KSP_SCEM_EE(8)” from the kit
Copy – Paste – as new layer and rename “Flower3”
Image – Resize – 15%
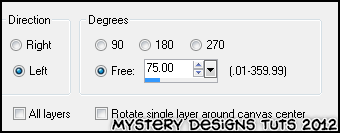
Image – Rotate – Free Rotate with the following settings :
Position it at the bottom-right of the frame with the previous two flowers
Add a drop shadow
**If there is any of the twig from earlier in the tut showing below the flowers, grab your eraser tool and carefully remove any overhang**
Making sure your “Flower3” layer is highlighted
Open up “KSP_SCEM_EE(18)” from the kit
Copy – Paste – as new layer and rename “Egg”
Image – Resize – 20%
Grab your “Change To Target” brush (the one that looks like a bullseye)
Change your foreground to #a3cad2 and your background to #9c6e99
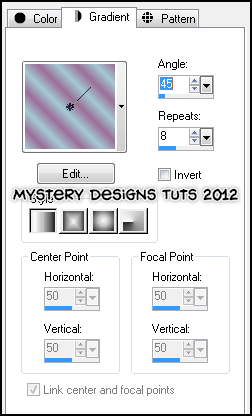
Change your background to Gradient – Foreground/Background with these settings :
Recolour the egg using your newly-created gradient
Position the egg at the bottom left-hand side of the frame
Add a drop shadow
Open up “KSP_SCEM_EE(11)” from the kit
Copy – Paste – as new layer and rename “Butterfly1”
Image – Resize – 7%
Using your “Change To Target” brush again, and the same gradient as earlier, recolour the butterfly
Position the butterfly over towards the top left-hand side of the frame
Layers – Duplicate and rename “Butterfly2”
Image – Resize – 85%
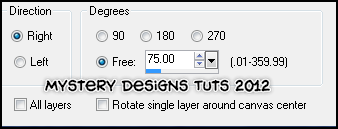
Image – Rotate – Free Rotate with these settings :
Repeat the Free Rotate
Adjust – Sharpness – Sharpen
Add a drop shadow to both of your butterflies
Highlight your “Raster 1” layer
Selections – Select All
Open up “KSP_SCEM_PP(2)” from the kit
Copy – Paste – Into Selection and rename “Mask”
Selections – None
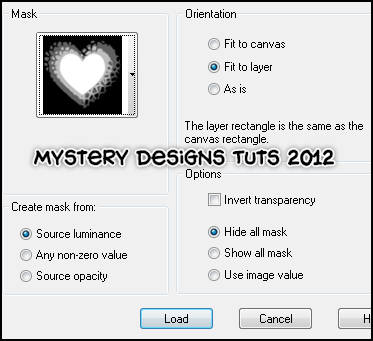
Layers – Load/Save Mask – Load from disk and choose “DBV Mask 58” with these settings :
Highlight your “Butterfly2” layer
Open up your wordart – I am using Teresa's “21kfioo”
Copy – Paste – as new layer and rename “Wordart”
Position it along the top of your tag
Grab your “Change To Target” brush again and recolour with the gradient from earlier
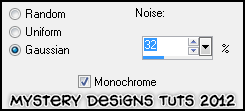
Adjust – Noise – Add/Remove noise with the following settings :
Selections – Select All – Float – Defloat
Selections – Modify – Expand – 2 pixels
Layers – New Raster Layer and rename “Wordback”
Floodfill this layer with white
Selections – None
Layers – Arrange – Move Down
Add a drop shadow
Grab your tube
Copy – Paste – As New Layer and rename “Tube2”
Arrange your tube on your tag until you are happy
Once happy
Layers – Duplicate and rename “Tube2a”
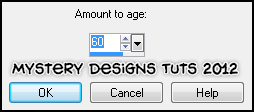
Effects – Photo Effects – Sepia Toning with the default settings :
Change the Blend Mode to “Saturation (Legacy)”
Highlight your “Tube2” layer again
Add a drop shadow
**If you wish to resize your tag, now is the time to do so**
Add your name and all copyrights.
Save your finished tag and you’re done!

2 comments:
Had to see what you created with my little kit, lol. It's gorgeous. I posted it on my blog here's the link http://kittylicious11.blogspot.com/2012/04/tag-and-tut-by-mysterydesigns.html Thanks for using my kit
hugs
Luisa
KittysScrapPost
Hi Luisa, you are so very welcome and thankyou for the compliment! I'm delighted you liked how it turned out, your gorgeous kit was a dream to work with! I've left you a pressie at the link you sent ;) Thanks so much again for sharing your beautiful creations, *huggs* Debs aka Mystery Designs xx
Post a Comment