

This tutorial was written on Sunday, April 29th 2012 by Mystery Designs. It was written in PSP X2 and assumes a good, working knowledge of the program. Any similarity to other tutorials is purely coincidental and not done intentionally. Please do not copy or claim the tutorial as your own. If you wish to do so, please link to my blog should groups or forums use it in challenges, and please leave me a comment with a link to where it is being used. Thanks :)
**Supplies Needed**
Tube(s) of choice. I'm using the cute art of Toosh Toosh. You need a license to use their art and you can find them over here (www.tooshtoosh.com )
Scrapkit of choice. I'm using an adorable kit called “A Day At The Zoo” by Jen of Sleek N Sassy Designz. You can purchase it in her store here
Mask of choice. I'm using a freebie mask by Melissa's Creationz (Mask 6) which you can collect here
Font of choice
When downloading supplies, please don't forget to leave some love for the awesome designers! Thanks!
**Plugins**
None
Ready? Lets begin.....
Open up your tube(s)
Press shift + d to duplicate
Close the original(s)
Open a new image – Canvas Size – 800 x 650 pixels
I know this is a little bit big, but it is just to allow room to work, the tag can always be resized later on :)
Open up “Frame 2” from the kit
Copy – Paste – As New Layer and rename “Frame1”
Image – Resize – 60%
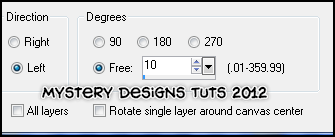
Image – Rotate – Free Rotate with these settings :
Arrange over to the top-left of your tag
Layers – Duplicate and rename “Frame 2”
Image – Mirror and arrange so that it overlaps the previous frame (see my tag for guidance)
Highlight your “Frame 1” layer
Grab your Magic Wand tool with these settings :

Select the inside of the frame
Selections – Modify – Expand – 4 pixels
Layers – New Raster Layer and rename “Inside 1”
Open up “Paper 3” from the kit
Copy – Paste – Into Selection
Selections – None
Layers – Arrange – Move Down
Lower the Opacity to around 57
Highlight your “Frame 2” layer
Grab your Magic Wand tool again with the same settings
Select the inside of the frame
Selections – Modify – Expand – 4 pixels
Highlight your “Frame 1” layer and hit delete
Highlight your “Inside 1” layer and hit delete
Highlight your “Frame 2” layer again
Layers – New Raster Layer and rename “Inside 2”
Open up “Paper 7” from the kit
Copy – Paste – Into Selection
Selections – None
Layers – Arrange – Move Down
Lower the Opacity to around 57 again
Copy – Paste your tube as a new layer and rename “Tube 1”
Arrange it behind “Frame 2” until you are happy with the placement
Layers – Duplicate and rename “Tube 1a”
Layers – Arrange – Move Up
Grab your Eraser tool and carefully erase any of your tube which overhangs the bottom of your frame
Highlight your “Tube 1” layer again
Add a drop shadow
Highlight your “Inside 1” layer
Copy – Paste your tube again, or a different tube and rename “Tube 2”
Arrange it behind “Frame 1” until you are happy with how it looks
Layers – Duplicate and rename “Tube 2a”
Layers – Arrange – Move Up
Grab your Eraser Tool again and carefully erase any of your tube which overhangs the bottom of your frame or the overlap between the two frames (this will vary depending on your tube and the size)
Highlight your “Tube 2” layer
Add a drop shadow
Highlight your “Frame 1” layer
Add a drop shadow
Highlight your “Frame 2” layer
Add a drop shadow
Highlight the “Raster 1” layer and rename to “Mask”
Grab your Floodfill Tool and change your Foreground to #62cabf and your Background to #87b734 (or two colours which compliment your tag)
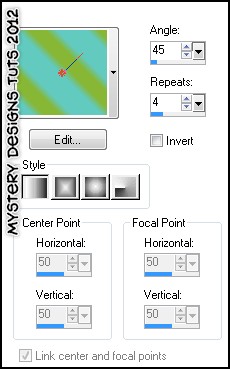
Change your Background to Gradient – Foreground/Background with these settings :
Floodfill your “Mask” layer using the newly created gradient
Layers – Load/Save Mask – Load Mask From Disk
Select “MC_Mask6” with the following settings :

Open up “Paper 3” from the kit again
Change your Background to Patter and select “Paper 3”
Close off your Foreground
Grab your Preset Shape Tool – Elipse with these settings :

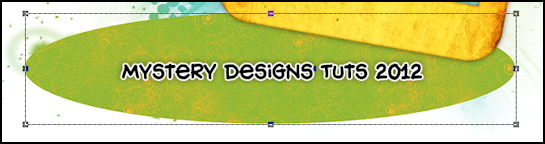
Draw out a squashed elipse so that it sits below your two frames. The aim is too look like a patch of grass :
Once you are happy with the size and shape
Layers – Convert To Raster Layer and rename “Grass”
Highlight your top layer (“Tube 1a”)
Open up the “Sign” element from the kit
Copy – Paste – As New Layer and rename “Sign”
Image – Resize – 50%
Arrange over to the left of your grass circle
Add a drop shadow
Open up “Monkey 2” from the kit
Copy – Paste – As New Layer and rename “Monkey”
Image – Resize – 35%
Arrange your monkey so that he is stood on top of the sign
Add a drop shadow
Open up the “Flower 2” element from the kit
Copy – Paste – As New Layer and rename “Flower”
Image – Resize – 30%
Arrange the flower over by the sign
Layers – Duplicate and rename “Flower A”
Arrange this second flower over on the right-hand side of your tag by the bottom corner of your frame
Open up the “Flower” element from the kit
Copy – Paste – As New Layer and rename “Flower B”
Image – Resize – 35%
Arrange it down by the sign again until you are happy how it looks
Layers – Duplicate and rename “Flower C”
Image - Mirror
Arrange it over on the right-hand side again by the other flower until you are happy with how it looks (please see my tag for guidance)
Once happy, add a drop shadow to all four of the flower layers
Making sure your top layer is highlighted again (“Flower C”)
Open up the “Rocks and Grass” element from the kit
Copy – Paste – As New Layer and rename “Rocks”
Arrange it on the grass circle at the bottom of your tag until you are happy with the placement
Add a drop shadow
Open up the “Pinwheel” element from the kit
Copy – Paste – As New Layer and rename “Pinwheel”
Image – Resize – 5%
Arrange it over to the bottom-left of your tag by the sign
Add a drop shadow
Open up the “Lion” element from the kit
Copy – Paste – As New Layer and rename “Lion”
Image – Resize – 35%
Sit your lion in front of the rocks
Add a drop shadow
Open up the “Train” element from the kit
Copy – Paste – As New Layer and rename “Train”
Image – Resize – 10%
Arrange it next to the lion
Add a drop shadow
**If you wish to resize your tag, now is the time to do so**
I resized mine by 75%
Add your name and all copyrights.
Save your finished tag and you’re done!
Here is another example using the sweet art of Suzanne Woolcott


No comments:
Post a Comment