

This tutorial was written on Monday, April 30th 2012 by Mystery Designs. It was written in PSP X2 and assumes a good, working knowledge of the program. Any similarity to other tutorials is purely coincidental and not done intentionally. Please do not copy or claim the tutorial as your own. If you wish to do so, please link to my blog should groups or forums use it in challenges, and please leave me a comment with a link to where it is being used. Thanks :)
**Supplies Needed**
Tube of choice. I'm using the art of Caron Vinson. You need a license to use her work which you can get over here
Scrapkit of choice. I'm using a gorgeous kit called “The First Day of Spring” by Jackie of Jackie's Jewels. You can purchase it in the newly opening store here. The Grand Opening is on May 1st 2012
Font of choice
**Plugins**
None
Ready? Lets begin.....
Open up your tube
Press shift + d to duplicate
Close the original
Open a new image – Canvas Size – 800 x 800 pixels
This may seem a little big, but it is just to allow room to work, the tag can always be resized later on :)
Open up “Frame1” from the kit
Copy – Paste – As New Layer and rename “Frame”
Image – Mirror
Arrange slightly over to the right
Grab your Magic Wand tool with these settings :

Select the inside of the frame
Selections – Modify – Expand – 4 pixels
Layers – New Raster Layer and rename “Inside”
Open up “Paper8” from the kit
Copy – Paste – Into Selection
** Do Not Deselect**
Layers – Arrange – Move Down
Open up the “LightScatter” element from the kit
Copy – Paste – As New Layer and rename “Overlay”
Selections – Invert and hit delete
Layers – Arrange – Move Down
Change the Blend Mode to “Screen”
Copy – Paste your tube as a new layer and rename “Tube 1”
Arrange over the inside of the frame until you are happy with how it looks and hit delete
Change the Blend Mode to “Luminance (Legacy)”
Selections - None
Highlight your “Frame” layer
Add a drop shadow
Open up the “GrassMound” element from the kit
Copy – Paste – As New Layer and rename “Grass”
Arrange along the bottom of your frame so it overlaps the bottom edge
Add a drop shadow
Open up the “Tree1” element from the kit
Copy – Paste – As New Layer and rename “Tree”
Image – Resize – 65%
Arrange over to the right-hand side of your frame
Add a drop shadow
Layers – Arrange – Move Down
Highlight your “Grass” layer
Open up the “Bird1” element from the kit
Copy – Paste – As New Layer and rename “Bird1”
Image – Resize – 35%
Arrange the bird so that it is sitting in the tree
Add a drop shadow
Open up the “Flower1” element from the kit
Copy – Paste – As New Layer and rename “Flower1”
Image – Resize – 35%
Arrange somewhere in the middle of the mound of grass
Add a drop shadow
Open up the “Flower2” element from the kit
Copy – Paste – As New Layer and rename “Flower2”
Image – Resize – 30%
Arrange over at the bottom of the tree trunk
Add a drop shadow
Open up the “FlowerStem” element from the kit
Copy – Paste – As New Layer and rename “Stem”
Image – Resize – 35%
Arrange over by your second flower and the tree
Layers – Arrange – Move Down
Add a drop shadow
Highlight your “Flower2” layer
Open up the “Bird2” element from the kit
Copy – Paste – As New Layer and rename “Bird2”
Image – Mirror
Image – Resize – 35%
Arrange over on the bottom-right of the grass mound
Add a drop shadow
Grab your tube again and Copy – Paste – As New Layer – rename “Tube2”
Arrange over on the bottom-left of your tag
Add a drop shadow
Open up the “Bucket” element from the kit
Copy – Paste – As New Layer and rename “Bucket”
Image – Resize – 40%
Arrange over on the bottom-left of the grass mound
Add a drop shadow
Open up the “Brushes” element from the kit
Copy – Paste – As New Layer and rename “Brushes”
Image – Resize – 35%
Image – Free Rotate with these settings :
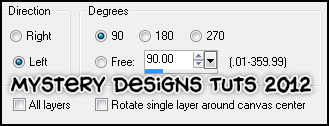
Image – Flip
Arrange at the bottom-left near the bucket you just placed
Add a drop shadow
Open up the “JarofFlowers” Element from the kit
Copy – Paste – As New Layer and rename “Jar”
Image – Resize – 35%
Arrange over at the bottom-left of your tag near the brushes
Add a drop shadow
**If you wish to resize your tag, now is the time to do so**
Add your name and all copyrights.
Save your finished tag and you’re done!

No comments:
Post a Comment