
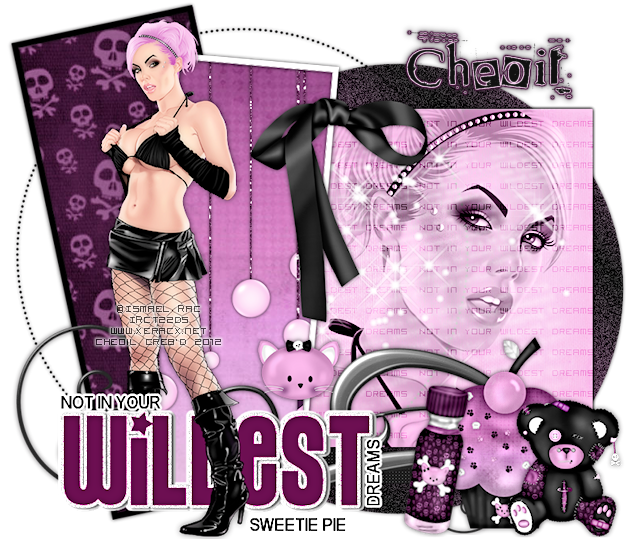
(Please click image to bring up the full-size tag. Thanks!)
This tutorial was written on Friday, March 30th 2012 by Mystery Designs. It was written in PSP X2 and assumes a good, working knowledge of the program. Any similarity to other tutorials is purely coincidental and not done intentionally. Please do not copy or claim the tutorial as your own. If you wish to do so, please link to my blog should groups or forums use it in challenges, and please leave me a comment with a link to where it is being used. Thanks :)
**Supplies Needed**
Tube(s) of choice. I'm using one of Xeracx's awesome girls which you can purchase here
Scrapkit of choice. I am using the one which came in the HD plus pack with the tube, but any goth-style kit would work
Template of choice. I'm again using the one which came in the HD plus pack with the tube
Word art of choice. I'm using some of the awesome collab wordart found over at Creative Misfits. It is the one made by Sapphire and you can get it here
Fonts of choice. I am using “Visitor TT2” for the pixel text and “Got Heroin” for the main text
WHEN DOWNLOADING SUPPLIES, PLEASE TAKE A MOMENT TO THANK THESE WONDERFUL DESIGNERS WHO SHARE THEIR AMAZING WORK AND TIME SO FREELY. THANKS!
**Plugins**
Eyecandy Gradient Glow
Penta.com Dot & Cross
Mura's Meister Copies
Ready? Lets begin.....
Open up your tube of choice
Press shift + d to duplicate
Close the original
Open up your template
Press shift + d to duplicate
Close the original
Delete the “TOU” layer
Don't worry that the template is rather large, we can always resize later on :)
Highlight the “Circle” layer
Selections – select all – float – defloat
Layers – New Raster Layer – rename “Circle1”
Change your foreground and background to two complimentary colours from your tube/kit. I am using the following : ##925888 and #925888
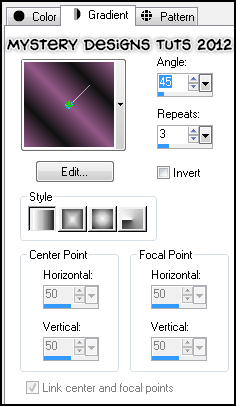
Change your background to gradient – foreground/background with these settings :
Using your foodfill tool, fill your circle
Selections – none
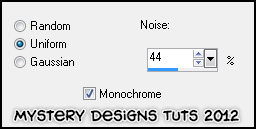
Adjust – add/remove noise – add noise with these settings :
Add a drop shadow
Delete the “Circle” layer
Highlight the “sm rectangle” layer
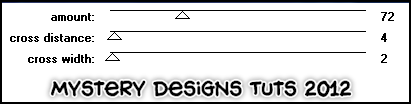
Effects – Plugins – Penta.com – Dot and Cross with these settings :
Add a drop shadow
Highlight the “dotted circle” layer
Adjust – Brightness and Contrast – Brightness/Contrast with these settings :
Brightness = - 255 Contrast = 0
Add a drop shadow
Layers – arrange – move down
Layers – arrange – move down
Your dotted circle should now be below the “lg rectangle” layer
Highlight the “angled rectangle 1” layer
Selections – select all – float – defloat
Open up “pp1” from the kit
Change your background layer to pattern
Choose “pp1”
With your floodfill tool, fill your selection
Selections - none
Highlight the “angled rectangle 1 frame” layer
Adjust – Brightness and Contrast – Brightness/Contrast with these settings :
Brightness = -255 Contrast = 0
Add a drop shadow
Highlight the “angled rectangle 2” layer
Selections – select all – float – defloat
Open up “pp3” from the kit
Change your background layer to pattern
Choose “pp3”
With your floodfill tool, fill your selection
**Do Not Deselect**
Open up the “balldangler” element from the kit
Copy – paste – as new layer and rename “dangles”
Position over your selected area
Once happy go to selections – invert and hit delete
Selections – none
Add a drop shadow
Highlight the “angled rectangle 2 frame” layer
Adjust – Brightness and Contrast – Brightness/Contrast with these settings :
Brightness = 255 Contrast = 0
Highlight the “lg rectangle” layer
Selections – select all – float – defloat
Layers – new raster layer and rename “lrg rec”
Open up “pp2” from the kit
Copy – paste – into selection
** Do Not Deselect**
Copy – paste your tube as a new layer and rename “Tube 1”
Place it over the selected area.
Once happy go to selections – invert and hit delete
Change the blend mode of this layer to “Luminance (Legacy)”
Selections - none
Highlight the “Raster 1” layer
Selections – select all
Highlight your “Tube 1” layer again
Image – crop to selection
(This will remove any excess tube which could cause trouble later when resizing)
Delete the “lg rectangle” layer
Using your text tool set on a pixel font, type in your phrase/saying. I am using the following settings, and the wording “Not In Your Wildest Dreams”, colour #111111 :

Objects – Align – Center In Canvas
Convert to raster layer and rename “text”
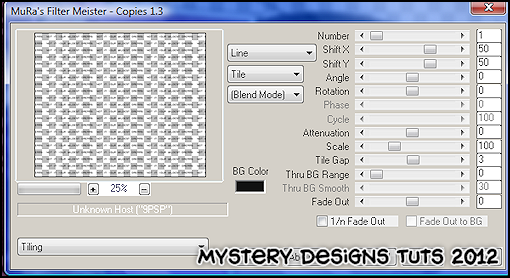
Effects – Mura's Meister – Copies with these settings :
Highlight your “lrg rec” layer again
Selections – select all – float – defloat
Selections – invert
Highlight your “text” layer and hit delete
Selections – none
Layers – Arrange – Move Up
Change the blend mode of this layer to “Overlay”
Highlight your “lrg rectangle” layer again
Selections – select all – float – defloat
Highlight your “text” layer
Open up the “sparkles” element from the kit
Copy – paste – as new layer and rename “sparkles”
Position them over your selected area
Once happy go to selections – invert and hit delete
Selections – none
Highlight your “lrg rec” layer
Add a drop shadow
Highlight your “angled rectangle 2 frame” layer
Open up the “bow” element from the kit
Copy – paste – as new layer and rename “Bow”
Image – resize – 55%
Position the bow so it overlaps the frame and the large rectangle (see my tag for guidance)
Add a drop shadow
Open up the “doodle” element from the kit
Copy – paste – as new layer and rename “doodle”
Position along the bottom of your tag
Add a drop shadow
Open up the “cuppy” element from the kit
Copy – paste – as new layer and rename “cupcake”
Image – resize – 45%
Position it on the bottom-right of your tag
Add a drop shadow
Open up the “bear” element from the kit
Copy – paste – as new layer and rename “bear”
Image – resize – 35%
Position it next to the cupcake on the bottom-right of your tag
Add a drop shadow
Open up the “nailpolish” element from the kit
Copy – paste – as new layer and rename “polish”
Image – resize – 35%
Image – rotate – free rotate with these settings :
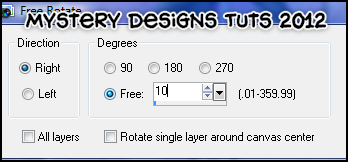
Position it so it rests alongside the cupcake on the bottom-right of your tag
Add a drop shadow
Open up your wordart. I am using the one made by Sapphire called “Saphwordart2cmblog-vi”
Control + d to duplicate
Close the original
Using your eraser tool, erase the credits
Copy – paste – as new layer and rename “wordart”
Move it over to the bottom-left of your tag
Using your Change To Target brush (the one that looks like a bullseye), recolour your wordart to match your tag. I am using #f5b5e4
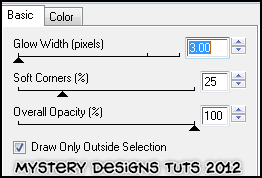
Effects – Eyecandy – Gradient Glow with these settings :
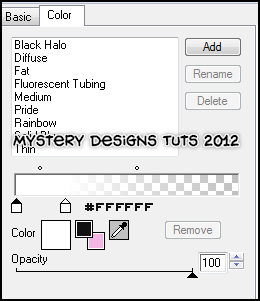
Repeat the Gradient Glow, same settings
Open up the “emokittypop” element from the kit
Copy – paste – as new layer and rename “pop”
Image – resize – 30%
Layers – Arrange – Move Down
Position behind the letter “S” in the wordart
Add a drop shadow
Highlight your “wordart” layer
Copy – paste your tube as a new layer and rename “Tube 2”
Layers – duplicate and rename the duplicate layer “Tube 2a”
Highlight your “Tube 2” layer
Layers – Arrange – Move Down
Highlight your “wordart” layer again
Selections – select all – float – defloat
Highlight your “Tube 2a” layer
Using your eraser tool, erase the left boot and leg of your tube which overhangs the wordart. The aim is to make it look like she is stepping over the wordart. You may need to play with this a bit, depending on which tube and wordart you have chosen.
Selections – none
Highlight your “Tube 2” layer
Add a drop shadow
Highlight your “wordart” layer
Add a drop shadow
**If you wish to resize your tag, now is the time to do so**
I resized this particular tag to 80% it's original size
Add your name and all copyrights.
Save your finished tag and you’re done!

1 comment:
lovely tag - just one note for the gradient colors you have the same settings twice :)
Post a Comment