

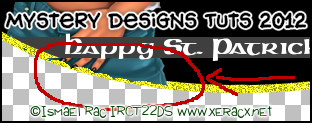
(Please click image to bring up the full size tag. Thanks!)
This tutorial was written on Friday, March 9th 2012 by Mystery Designs. It was written in PSP X2 and assumes a good, working knowledge of the program. Any similarity to other tutorials is purely coincidental and not done intentionally. Please do not copy or claim the tutorial as your own. If you wish to do so, please link to my blog should groups or forums use it in challenges, and please leave me a comment with a link to where it is being used. Thanks :)
**Supplies Needed**
Tube of choice. I am using an older tube by Xeracx called “Lucky Charms” As far as I'm aware, it is no longer available to buy, but Ismael has some gorgeous new Irish girl tubes this year which you can find over in his store here
Scrapkit of choice. I am using a pretty kit called “Patty's Pub” by Tonya of Broken Sky Dezine. Info on how to purchase the kit can be found here
Template of choice. I am using a freebie template by Stef and Dwana – Template 04 which you can download from here
Font of choice.
WHEN DOWNLOADING SUPPLIES, PLEASE TAKE A MOMENT TO THANK THESE WONDERFUL DESIGNERS WHO SHARE THEIR AMAZING WORK AND TIME SO FREELY. THANKS!
**Plugins**
None
Ready? Lets begin.....
Open up the template in PSP
Press shift + d to duplicate it
Close the original
On the duplicate, delete the CREDITS layer
Open up your tube of choice
press shift + d to duplicate it
Close the original
Image – Canvas Size – 800 x 568 pixels (Center placement)
Don't worry, this is just so we have room to work. We can resize later.
Highlight the "blk oval" layer
Copy and paste your tube as a new layer and rename “Tube1”
Move it over to the left of your tag
With your eraser tool, wipe out any of your tube that sits below the oval frame
Layers – duplicate and rename “Tube2”
Drag this layer so it sits above the “oval frame” layer
Highlight the “thin strips in oval” layer
Selections – select all – float – defloat
Highlight your “Tube 2” layer and with your eraser tool again, wipe out any of your tube that overhangs the bottom strip
Selections none
Still with your “Tube 2” layer highlighted, carefully use your eraser tool to wipe out the rest of the overhang from your tube along the bottom of your tag, below the bottom strip and wording
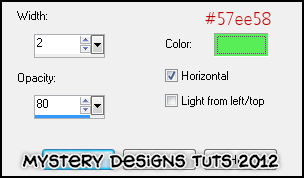
Highlight your “Tube 1” layer again and add a drop shadow of choice.
Highlight the “left square” layer
Change your foreground to a colour from your tube/kit
I am using #036b09
With your Change To Target Brush (the one that looks like a bullseye), recolour this square
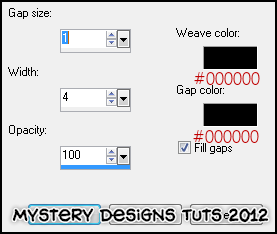
Effects – Texture Effects – Weave with these settings :
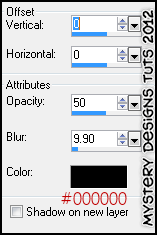
Add a drop shadow of choice. I am using the following :
Highlight the “square strips” layer and repeat the recolour from before
Highlight the “black shamrock” layer
Selections – select all – float – defloat
Open up paper “BSD9” from the kit
Copy – paste – into selection
Selections – none
Highlight the “lrg circle back” layer
Selections – select all – float – defloat
Layers – new raster layer and rename “lrg circle back2”
Open up paper “BSD1” from the kit
Copy – paste – into selections
Selections – none
Add a drop shadow
Delete the “lrg circle back” layer
Highlight the “sm vertical rectangle” layer
Using your Change To Target Brush again, same settings, recolour this rectangle
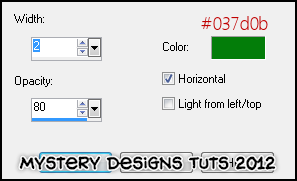
Effects – Texture Effects – Blinds with these settings :
Add a drop shadow of choice
Highlight the “lrg vertical rectangle” layer
Again, using your Change To Target Brush with the same settings, recolour this rectangle
Add a drop shadow
Highlight the “lower right rectangle” layer
Once again, recolour this rectangle with your Change To Target Brush
Effects – Texture Effects – Blinds with these settings :
Add a drop shadow
Highlight the “blk oval” layer
Selections – select all – float – defloat
Open up paper “BSD6” from the kit
Copy – paste – into selections
Selections – none
Highlight the “thin strips in oval” layer
Once again, recolour this layer with the previous settings and colour
Add a drop shadow
Highlight the “oval frame” layer
Repeat the recolour and drop shadow
Highlight the “sm circle” layer
Selections – select all – float – defloat
Layers – new raster layer and rename “sm circle1”
Open up paper “BSD9” again from the kit
Copy – paste – into selection
Selections – none
Add a drop shadow
Delete the “sm circle” layer
Highlight the “green shamrock” layer
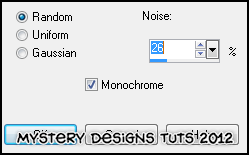
Adjust – Add/Remove Noise – Add Noise with these settings :
Add a drop shadow
Highlight the “happy st pat text” layer and add a drop shadow
Highlight the “oval frame” layer
Open up the element “BSD4” from the kit
Copy – paste – as new layer and rename “Rainbow”
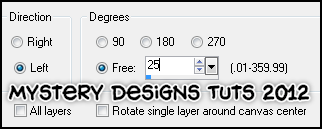
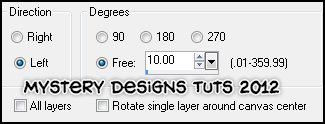
Image – rotate – free rotate with these settings :
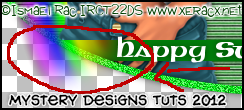
Using your eraser tool, wipe out any of the rainbow that overhangs the oval at the bottom right of your tag (see below for guidance)
Highlight the “happy st pat text” layer
Open up the element “BSD38” from theh kit
Copy – past – as new layer and rename “Hat”
Image – resize – 35%
Move the newly resized hat over to the bottom left of your tag
Add a drop shadow
Open up the element “BSD21” from the kit
Copy – paste – as new layer and rename “Shoe”
Image – resize – 30%
Image – rotate – free rotate with these settings :
Move your horseshoe over so it sits in front of your hat
Add a drop shadow
Open up element “BSD29” from the kit
Copy – paste – as new layer and rename “Pint”
Image – resize – 15%
Move your glass over so it rests in front of the horseshoe
Add a drop shadow
Open up element “BSD32” from the kit
Copy – paste – as new layer and rename “Coins1”
Image – resize – 20%
Move your coins so they cover the bottom of your pint glass
Layers – duplicate and rename the copied layer “Coins2”
Image – mirror
Move the mirrored image so that it nestles next to the previous coins and when you are happy with their placement, add a drop shadow to both coin layers
Open up element “BSD20” from the kit
Copy – paste - as new layer and rename “Candles”
Image – resize – 20%
Move your candles so they sit by your hat and coins
Add a drop shadow
Open up element “BDS5” from the kit
Copy – paste – as new layer and rename “Button”
Image – resize – 20%
Move your button so it sits inside the shamrock leaf over on the top left of your tag
Add a drop shadow
Open up element “BSD26” from the kit
Copy – paste – as new layer and rename “Party1”
Image – resize – 75%
Move your element so that the glitter overhangs the top right circle in your tag
Layers – duplicate and rename “Party 2”
Image – Mirror
Layers – Merge – Merge Down
Layers – Arrange – Send To Bottom
Highlight your “Coins2” layer
Open up element “BSD22” from the kit
Copy – paste – as new layer and rename “Shamrocks”
Image – resize – 85%
Move your shamrocks so that they rest along the bottom of your tag
Layers – Arrange – Send To Bottom
Add a drop shadow
Open up element “BSD18” from the kit
Copy – paste – as new layer and rename “Ivy”
Image – resize – 65%
Layers – duplicate and rename “Ivy2”
Drag this layer up in your layer pallet so that it is above your “Candles” layer
Using your eraser tool, carefully remove any parts of the ivy you do not wish to be showing.
**If you wish to resize your tag, now is the time to do so**
Add your name and all copyrights.
Save your finished tag and you’re done!

2 comments:
Fantastic tutorial, Mystery Designs! Hi I'm Dwana and I love what you did with mine and Stef's collab template. If you don't mind I will be linking your tutorial on my blog.
Thanks for using our collabs!
Hi Dwana, thankyou for your kindness and for the compliment! I don't mind at all if you link, in fact I would be delighted! It was a pleasure to use your temps for this, thanks again for sharing them for peeps to use!
*huggs* Debs aka Mystery Designs xx
Post a Comment