

(Please click the picture above to bring up the full size image. Thanks!)
This tutorial was written on Friday, January 27th 2012 by Mystery Designs. It was written in PSP X2 and assumes a good, working knowledge of the program. Any similarity to other tutorials is purely coincidental and not done intentionally. Please do not copy or claim the tutorial as your own. If you wish to do so, please link to my blog should groups or forums use it in challenges, and please leave me a comment with a link to where it is being used. Thanks! :)
This tutorial was written on Friday, January 27th 2012 by Mystery Designs. It was written in PSP X2 and assumes a good, working knowledge of the program. Any similarity to other tutorials is purely coincidental and not done intentionally. Please do not copy or claim the tutorial as your own. If you wish to do so, please link to my blog should groups or forums use it in challenges, and please leave me a comment with a link to where it is being used. Thanks! :)
**Supplies Needed**
Tube of choice. As ever, I am using the stunning art of of my favourite artist Mr Ismael Rac. He is PTU, and you can find his work over here. I am using his beautiful Holiday Fairy for this one.
Scrapkit of choice. I am using a gorgeous kit called “Rejuvination” by Kim Broedelet which you can collect here. It is a freebie too! Thanks Kim!
Template of choice. I am using a cool template by Pooker of Elegant Inspirations which you can find over here on her blog
Mask of choice. I am using EllaMask1 which is part of a Creative Misfits collab. You can collect it here
Font of choice.
WHEN DOWNLOADING SUPPLIES, PLEASE TAKE A MOMENT TO THANK THESE WONDERFUL DESIGNERS WHO SHARE THEIR AMAZING WORK AND TIME SO FREELY. THANKS!
**Plugins**
Penta.com – Dot and Cross
DSB Flux – Bright Noise
Ready? Lets begin.....
Open up the template in PSP
Press shift + d to duplicate it
Close the original
On the duplicate, delete the Copyright layer and the DkGreenCircle layer
Open up your tube of choice
press shift + d to duplicate it
Close the original
Highlight the "BlackCircle" layer (the smaller one of the two)
Open up “kb-rejuvinate_frame1” from the kit
Copy – paste – as new layer and rename “Frame”
Image – resize – 36% (make sure that all layers is unchecked)
Position it over the BlackCircle layer
Highlight the “DotCircle” layer
Open up “kb-rejuvinate_flare2” from the kit
Copy – paste – as new layer and rename “button1”
Image – resize – 50%
Position it over the top of the dotted circle
Delete the “DotCircle” layer
Highlight the “WhiteCircle” layer
Open up “kb-rejuvinate_flare1” from the kit
Copy – paste – as new layer and rename “button2”
Image – resize – 30%
Position it over the white circle
Delete the “WhiteCircle” layer
Highlight the “LtGreenCircle" layer
Selections – select all – float – defloat
Layers – new raster layer – rename this “Large Circle”
Open up kb-rejuvnate_01 from the scrapkit
Selections - select all - copy
Back to the Large Circle layer - paste – into selection
Selections – select none
Delete the “LtGreenCircle” layer
Highlight the "LtGreenCircles" layer
Selections – select all – float – defloat
Layers – new raster layer – rename this “Circles”
Open up kb-rejuvinate_02 from the scrapkit
Selections - select all - copy
Back to the Circles layer - paste – into selection
Selections – select none
Delete the “LtGreenCircles” layer
Highlight the “GreenSquare” layer
Selections – select all – float – defloat
Layers – new raster layer – rename this “Square”
Open up kb-rejuvinate_06 from the kit
Selections – select all – copy
Back to the “Square” layer – paste – into selection
Selections – select none
Delete the “GreenSquare” layer
Highlight the “rect1” layer
Selections – select all – float – defloat
Layers – new raster layer – rename this “bottom”
Using your floodlfill tool, fill this new layer with a colour to compliment your tag. The one I am using is #cac8ad
Selections – select none
Effects – plugins – Penta.com – Dot and Cross with the default settings :
Delete the “rect1” layer
Highlight the “Rect2” layer
Selections – select all – float – defloat
Layers – new raster layer – rename this “top”
Using your floodfill tool again, fill this new layer with a complimentary colour from your tag. I am using the same colour as I did before #cac8ad
Selections – select none
Effects – DSB Flux – Bright Noise with the default settings :

Delete the “Rect2” layer
Highlight the “GreyRect” layer
Selections – select all – float – defloat
Layers – new raster layer – rename this “Rect”
Open up kb-rejuvinate_09 from the kit
Selections – select all – copy
Back to the “Rect” layer – paste – into selection
Selections – select none
Delete the “GreyRect” layer
Highlight the “LtGreenStrip” layer
Selections – select all – float – defloat
Layers – new raster layer – rename this “Strip”
Open up kb-rejuvinate_09 again
Selections – select all – copy
Back to the “Strip” layer – paste – into selection
Selections – select none
Delete the “LtGreenStrip” layer
Highlight the “WhiteRect” layer
Selections – select all – float – defloat
Layers – new raster layer – rename this “Strip2”
Open up kb-rejuvinate_08 from the kit
Selections – select all – copy
Back to the “Strip2” layer – paste – into selection
Selections – select none
Delete the “WhiteRect” layer
Highlight the “BlackCircle” layer ( the larger circle below your “Rect” layer)
Selections – select all – float – defloat
Layers – new raster layer – rename this “Large Circle 2”
Open up kb-rejuvinate_08 from the kit again
Selections – select all – copy
Back to “Large Circle 2” layer – paste – into selection
Selections – select none
Delete the “BlackCircle” layer
Highlight the smaller “BlackCircle” layer (the one below your “Frame” layer)
Selections – select all – float – defloat
Layers – new raster layer – rename this “Frame Back”
Open up kb-rejuvinate_05 from the kit
Selections – select all – copy
Back to “Frame Back” layer – paste – into selection
Selections – select none
Delete the “BlackCircle” layer
Highlight the “button1” layer
Open up kb-rejuvinate_word8 from the kit
Copy – paste – as new layer and rename “Wordart”
Image – resize – 20% (once again make sure that all layers in unchecked)
Move and position it along the bottom of your tag
Highlight the “button1” layer again
Open up kb-rejuviante_flower1 from the kit
Copy – paste – as new layer and rename “Flower1”
Image – resize – 23% with all layers unchecked
Image – free rotate with the following settings :
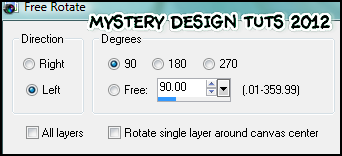
Move and position it behind the wordart along the bottom of your tag
Highlight the “Flower1” layer
Open up kb-rejuvinate_flower3 from the kit
Copy – paste – as new layer and rename “Flower2”
Image – resize – 13% with all layers unchecked
Move it over to the right-hand side of your tag (see my tag for guidance)
Layers – duplicate – rename this layer “Flower 3”
Move slightly further to the right and above the previous flower (see my tag for guidance)
Layers – duplicate – rename this layer “Flower 4”
Move it slightly down a little so that it forms a cluster of flowers (see my tag again for guidance)
Highlight the “Wordart” layer
Open up kb-rejuvinate_flutter from the kit
Copy – paste – as new layer and rename “Butterfly”
Image – resize – 30% with all layers unchecked
Move over to the right—hand side of your tag, above the wordart so that it is sat on the cluster of flowers you have just created.
Highlight the “Square” layer
Open up kb-rejuvinate_string2 from the kit
Copy – paste – as new layer and rename “String2”
Image – resize – 20% with all layers unchecked
Position it to your liking along the bottom of your tag so that it overlaps your frame in the middle of the tag (see my tag for guidance again)
Highlight the “Large Circle” layer
Open up kb-rejuvinate_string1 from the kit
Copy – paste – as new layer and rename “String1”
Image – resize – 20% with all layers unchecked
Position it to your liking so that it sits behind the middle frame (once again, see my tag for guidance)
Highlight the “Button1” layer again
Open up kb-rejuvinate_button3 from the kit
Copy – paste – as new layer and rename “Button3”
Image – resize – 22% with all layers unchecked
Position it at the top of your tag on the top of the strip
Keep the “Button3” layer highlighted
Open up kb-rejuvinate_bow2 from the kit
Copy – paste – as new layer and rename “Bow”
Image – resize – 12% with all layers unchecked
Move it so that it sits over the top of your newly placed button
Highlight the “Large Circle” layer
Selections – select all- float – defloat
Copy and paste your tube as a new layer and rename “Overlay”
Position it over the circle until you are happy
Once happy go to selections – invert and hit delete
Selections - select none
Change the blend mode of this layer to Hard Light or a blend that suits your tag and lower the opacity to around 48
Highlight the “Frame Back” layer
Selections – select all – float – defloat
Copy and paste your tube again as a new layer and rename “Tube”
Position/resize it so that it sits nicely inside the frame.
When you are happy go to selections – modify - expand by 3
Selections - invert – delete
Selections – select none
Add any drop shadows to your tag that you would like at this point
Highlight the “Raster1”
Choose two colours from your tag and set them as your foreground and background. I am using #e4e0ae and #c8e1d6
Change your background to gradient with the following settings :
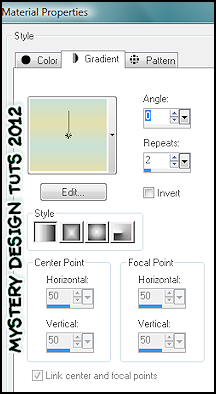
Using your floodfill tool, fill this layer with your new gradient
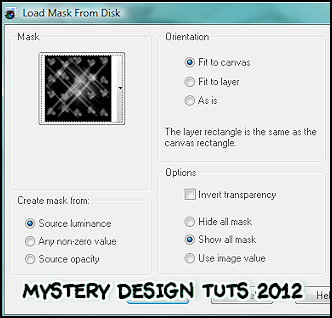
Layers – load/save mask - from disk and choose EllaMask1 with the following settings :
**If you wish to resize your tag, now is the time to do so**
Add your name and all copyrights. Save your finished tag and you’re done!

4 comments:
Awesome tut, thank you. I just wanted to say, that it's really very nice to find another tut blogger who knows how to link to an actual post instead of just the blog home page. It's really refreshing because so many don't do that. That's something that I make sure I do on my own blog as well.
Hi Queina :) Thankyou for the compliment and I'm happy you liked the tut! *huggs* xx
Hey it's me again, just wanted to show you the tag I made from this tut. Here's the link:
http://psptutstagsbyq.blogspot.com/2012/02/more-challenge-tags.html
Thanks ever so much again Queina :) Beautifully done! I love your choice of tube too, works wonderfully with the scrapkit! xx
Post a Comment