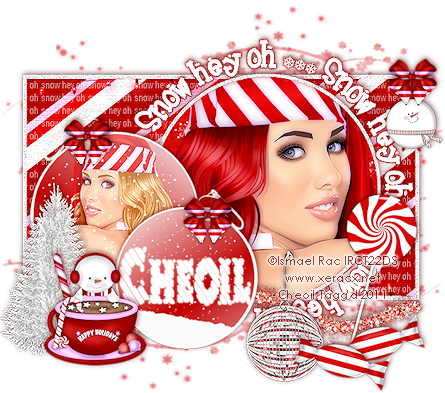
(Please click on the tag above for the full size image, thanks!)
This tutorial was written on Tuesday, 20th December 2011 by Mystery Designs. It was written in PSP X2 and assumes a good, working knowledge of the program. Any similarity to other tutorials is purely coincidental and not done intentionally. Please do not copy or claim the tutorial as your own. If you wish to do so, please link to my blog should groups or forums use it in challenges, and please leave me a comment with a link to where it is being used. I'd love to see any results of the tutorial, so please feel free to mail me here with your tags and I would be delighted to display them here on my blog for others to see :)
**Supplies Needed**
Tube of choice. I am using the stunning art of of my favourite artist Mr ©Ismael Rac. He is a PTU artist, and you can find his work over here. He also has some free tubes over at his store, all the details are over there.
Scrapkit of choice. I am using the adorable kit that came with Ish's tube HD pack called “Cute Xmas” which you can purchase over at his store too. (XeracX) It was created by a lady called Scottish Butterfly and you can find her blog here.
The cute Christmas template by Caroline called “Caroline-Temp3” which you can find over on the Misfits blog here
A mask of choice. I'm using one from the team over at Creative Misfits, it's by Janice and you can find it here.
Font of choice. The one I have used is called "Candy Cane"
WHEN DOWNLOADING SUPPLIES, PLEASE TAKE A MOMENT TO THANK THESE WONDERFUL DESIGNERS WHO SHARE THEIR AMAZING WORK AND TIME SO FREELY. THANKS!
**Plugins**
Xero - Porcelain
Ready? Lets begin.....
Open up the template in PSP
Press shift + d to duplicate it
Close the original
On the duplicate, delete the credits layer
Open up your tube of choice
press shift + d to duplicate it
Close the original
Highlight the "Rectangle" layer
Selections – select all – float – defloat
Layers – new raster layer – rename this “Rectangle 1”
Open up Paper 4 from the scrapkit
Selections - select all - copy
Back to the Rectangle 1 layer - paste – into selection
**Do Not Deselect**
Open up the “Lights” element from the scrapkit
Copy – paste – as new layer and rename this “Lights”
Position along the top edge of the rectangle
Selections – invert and hit delete
Selections – select none
Layers – duplicate – rename this “Lights 2”
Image - flip
Delete “Rectangle” layer
Highlight the "Large Circle" layer
Selections – select all – float – defloat
Layers – new raster layer – rename this “Large Circle 1”
Open up Paper 2 from the scrapkit
Selections - select all - copy
Back to the Large Circle 1 layer - paste – into selection
**Do Not Deselect**
Copy and paste your tube as a new layer and rename this “Tube 1”
Position it over your circle until you are happy with the placing.
Once happy go to selections – invert and hit delete
Selections – select none
Some of the edges on your tube layer may be a little jagged. If this is the case, click on your Soften brush and use it to smooth out the edges a little
Effects – Plugins – Xero – Porcelain using the default settings :
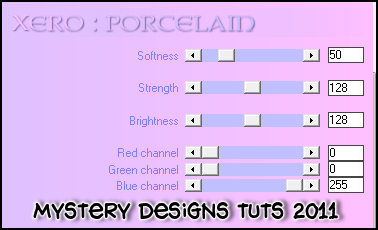
Delete “Large Circle” layer
Highlight the "Circle Medium" layer
Selections – select all – float – defloat
Copy and paste your tube again as a new layer and rename this “Tube 2”
Position it over your circle until you are happy with the placing.
Once happy go to selections – invert and hit delete
Selections – select none
Once again, some of the edges on your tube layer may be a little jagged. If this is the case, simply click on your Soften brush and use it to smooth out the edges a little.
Duplicate the Tube 2 layer and rename “Tube 2a”
Effects – plugins – Xero – Porcelain once again using the default settings :
Change the opacity of this layer to around 48
Highlight “Tube 1” layer
Change the blend mode of this layer to Screen
Highlight the “Wordart Back” layer and add a drop shadow
Highlight the “Large Circle Back” layer and add a drop shadow
Highlight the “Circle Medium Back” layer and add a drop shadow
Highlight the “Circle Small Back” layer and add a drop shadow
Highlight the “Rectangle Back” layer and add a drop shadow
Highlight the “Ornament Right” layer
Open up the “Cocoa” element from the scrapkit
Press shift + d to duplicate it and close the original
Image – resize by 46%
Copy – paste – as new layer and rename “Cocoa”
Position it to the left of your tag, just below the two ornaments
Add a drop shadow
Highlight the “Ornament Right” layer again
Open up the “Tree” element from the scrapkit
Press shift + d to duplicate it and close the original
Image – resize by 46%
Copy – paste – as new layer and rename “Tree”
Position to the left of your tag, behind the cup and snowman
Add a drop shadow
Once again highlight the “Ornament Right” layer
Open up the “Bow” element from the scrapkit
Press shift + d to duplicate it and close the original
Image – resize by 22%
Copy – paste – as new layer and rename “Bow”
Position it so that it is on top of the medium sized bauble
Add a drop shadow
Layers – duplicate – rename this layer “Bow 2”
Position it so that it is on top of the smaller sized bauble
Still keeping this layer highlighted, open up “Ornament1” from the scrapkit
Press shift + d to duplicate it and close the original
Image – resize by 33%
Copy – paste – as new layer and rename “Dec 1”
Position it on the top right corner of the rectangle
Add a drop shadow
Highlight the “Bow 2” layer
Layers – duplicate – rename this “Bow 3”
Drag this layer so that it is above the “Dec 1” layer
Position your bow over the hook of the ornament
Highlight the “Tube 1” layer
Open up the “Garland” element from the scrapkit
Copy – paste – as new layer and rename “Garland”
Position the garland along the bottom of your tag. Once you are happy with the placement, use your eraser tool to delete any unwanted part of the image.
Add a drop shadow
Highlight the “Tree” layer
Open up the “Candy Stick” element from the scrapkit
Press shift + d to duplicate it and close the original
Image – resize by 28%
Image – rotate – free rotate with the following settings :
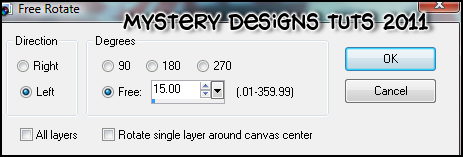
Copy – paste – as new layer and rename this “Cane”
Position it behind the cup and snowman
Add a drop shadow
Open up the “Candy” element from the scrapkit
Press shift + d to duplicate it and close the original
Image – resize by 64%
Image – rotate – free rotate with the same settings as before
Position it at the bottom right of your tag
Layers – duplicate – rename this layer “Candy 2”
Image – mirror and then move it once again to the bottom right of your tag above the other candy
Add a drop shadow to both candy layers
Highlight the “Cane” layer
Open up the “Ornament 2” element from the scrapkit
Image – resize by 57%
Adjust – sharpness sharpen
Copy – paste – as new layer and rename this “Dec 2”
Move it over to the right of your tag so it is sitting next to the candy you have just placed
Add a drop shadow
Once again, highlight the “Cane” layer
Open up the “Sucker” element from the scrapkit
Image – resize by 76%
Image – rotate – free rotate with the same settings as before, but instead of left, change it to right
Copy – paste – as new layer and rename “Sucker”
Position the sucker behind the other candy on the right hand side of your tag and once you are happy, add a drop shadow
Unhide the “Background” layer and highlight it
Layers – new raster layer – rename this layer “Mask”
Using your floodfill tool, fill this layer with a complimentary colour from your tube/scrapkit. I am using #e5474c
Open up the mask “flake4jek””
Over on your mask layer go to layers – new mask layer – from image and select the flake4jek mask with the following settings :
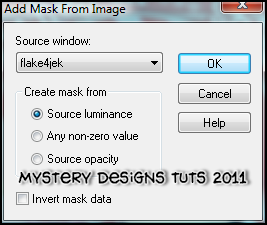
Once you have your mask layer, go to image – flip
**If you wish to resize your tag, now is the time to do so**
Add your name and all copyrights. Save your finished tag and you’re done!


No comments:
Post a Comment