
The first of what I hope to be many more CT Tutorials. I know Halloween is approaching, and I hope to get at least one more Halloweenie tut made up before it is too late. However, I felt like a break from spooky tags and when I saw this beautiful FTU add on kit from Sleek N Sassy, I couldn't help but have a play. I hope peeps enjoy and as always, I would love to see any results or if it is used anywhere in groups for a challenge etc, please leave me a link so that I may check it out. Thanks!! :)
This tutorial was written on Thursday, October 13th 2011 by Mystery Designs. It was written in PSP X2 and assumes a good, working knowledge of the program. Any similarity to other tutorials is purely coincidental, and not done intentionally. Please do not copy or claim the turorial as your own. If you wish to do so, please link to my blog should groups or forums use it in challenges, and please leave me a comment with a link to where it is being used. I'd love to see any results of the tutorial, so please feel free to mail me here with your tags and I would be delighted to display them here on my blog for others to see :)
**Supplies Needed**
Tube of choice. I am using the amazing art of ©Ismael Rac. He is a PTU artist, and you can find his work over here
Scrapkit of choice. I am using a beautiful FTU scrapkit from Jen over at Sleek N Sassy Designz called “Finding Neverland”. You can find it over on her blog here
Font of choice
WHEN DOWNLOADING SUPPLIES, PLEASE TAKE A MOMENT TO THANK THESE WONDERFUL DESIGNERS WHO SHARE THEIR AMAZING WORK AND TIME SO FREELY. THANKS!
**Plugins**
Eye Candy - Glass
Penta.com – Dot & Cross
Ready? Lets begin.....
Open up your tube
Press shift + d to duplicate it
Close the original
Open up my beads element
Press shift + d to duplicate it
Close the original
Open up a new image in PSP 600x600 pixels, transparent
Using your floodfill tool, fill with white and rename the layer “background”
Open up Element 62 from the kit
Copy – paste as new layer and rename “Frame”
Close the original
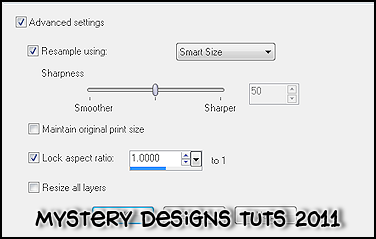
Rezize 86% with the following settings :
Recolour your frame layer to match the colours of your tube
Using your magic wand with these settings :

Select the inside of the frame
Selections – modify – expand by 4
**Do not deselect**
**Do not deselect**
Layers – new raster layer – rename “inside frame”
Open up paper 9 from the kit
Selections – select all – copy
Close paper 9
Back to your inside frame layer – paste – into selection
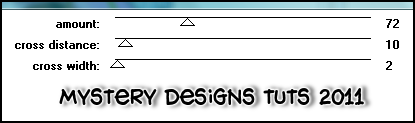
Effects – Plugins – Penta.com – Dot & Cross
Apply the default settings (see below)
Selections – none
Drag this layer so it is below the “Frame” layer
Highlight the frame layer
Selections – select all – float – defloat
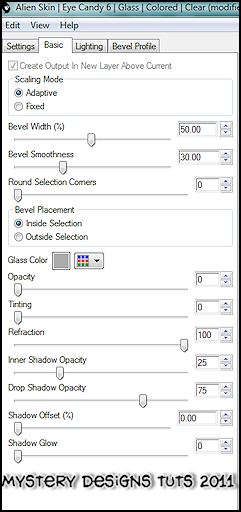
Open EyeCandy Glass – Clear with the following settings :
Selections – none
Open up element 40 from the kit
Copy – paste as new layer and rename “swing”
Close the original
Resize the swing layer 75% with the same settings as above and place it so the swing is overhanging the bottom of the frame (see my tag above for reference)
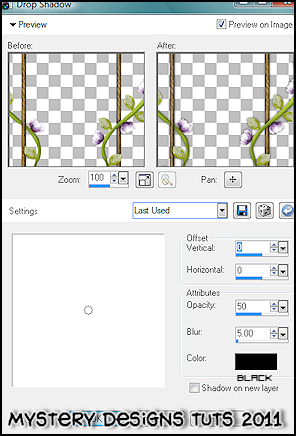
Add a drop shadow of choice. I’m using the following settings :
Open up element 24
Press shift + d to duplicate it
Close the original
Resize the flower to 22% using the same settings as above
Adjust – sharpness – sharpen
Copy – paste – new layer and rename “flower 1”
Move it so that it covers the left rope of the swing
Add a drop shadow of choice
Going back to the beads we duplicated at the start, select the yellow bead
Copy – paste as new layer and rename “bead 1”
Move so that it covers the centre of the flower
Highlight flower 1 layer
Layers – duplicate and rename this layer “flower 2”
Move it so that it covers the right rope of the swing
Repeat the steps above to add the bead to the centre of the flower, only rename this layer “bead 2”
Highlight flower 2 layer
Layers – duplicate and rename this layer “flower 3”
Move it so that is sits in between the previous two flowers (see my tag above for guidance)
Re-colour this flower to match your tube
Once again repeat the steps to add the bead to the centre of the flower, this time renaming the layer to “bead 3”
Close off all layers except flower 1 and bead 1
Right click on the flower 1 layer
Merge – merge visible
Rename this newly merged layer “Flower 1” and close it off
Unhide flower 2 and bead 2 layers
Merge – merge visible
Rename this newly merged layer “Flower2” and close it off
Unhide flower 3 and bead 3 layers
Merge – merge visible
Rename this newly merged layer “Flower3”
Unhide all layers except the white background layer
Merge – merge visible – rename this layer “tag”
Resize by 86% with the same settings as above
Unhide the background layer and highlight it
Open up paper 6 from the kit
Selections – select all – copy – close paper 6
Back to your background layer – paste – as new layer
Rename this layer “mask”
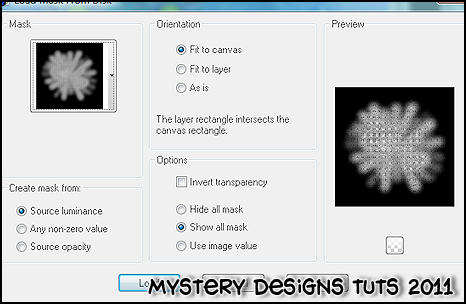
Sill on the mask layer, go to layers – load/save mask – load mask from disk
Select DBV Mask 89 with the following settings:
Highlight the tag layer
Copy and paste your tube and rename this layer “Tube”
Resize and add a drop shadow of choice
Making sure the tube layer is highlighted, open up my word art
Copy – paste as new layer and rename “wordart”
Place it along the bottom of your tag
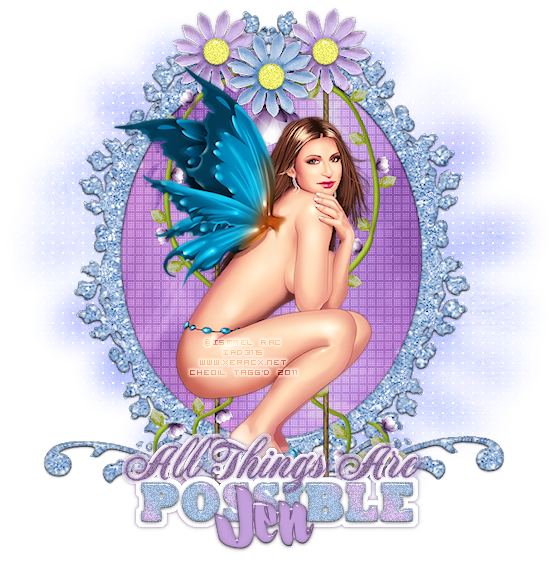
Add any names, all copyrights etc then save your finished tag and you're done!
===========================================
Many thanks to anybody who stops in to give this a go, and please don't forget to leave a note or send me any results should peeps wish to do so. Thanks :)

===========================================
Many thanks to anybody who stops in to give this a go, and please don't forget to leave a note or send me any results should peeps wish to do so. Thanks :)
1 comment:
i made you a tag i hope this makes it to you
[IMG]http://i742.photobucket.com/albums/xx64/LilDragonGFX/PSP-Party/Tut%20on%20PSP%20part/December%20TAT/Enchanting-Jen.png[/IMG]
Post a Comment